Creating a Subscription
Subscriptions Only offers three types of Subscription products including Fixed/One Time, Seat Based, and Usage Based. In this tutorial we’ll discuss Creating a Subscription, here’s how.
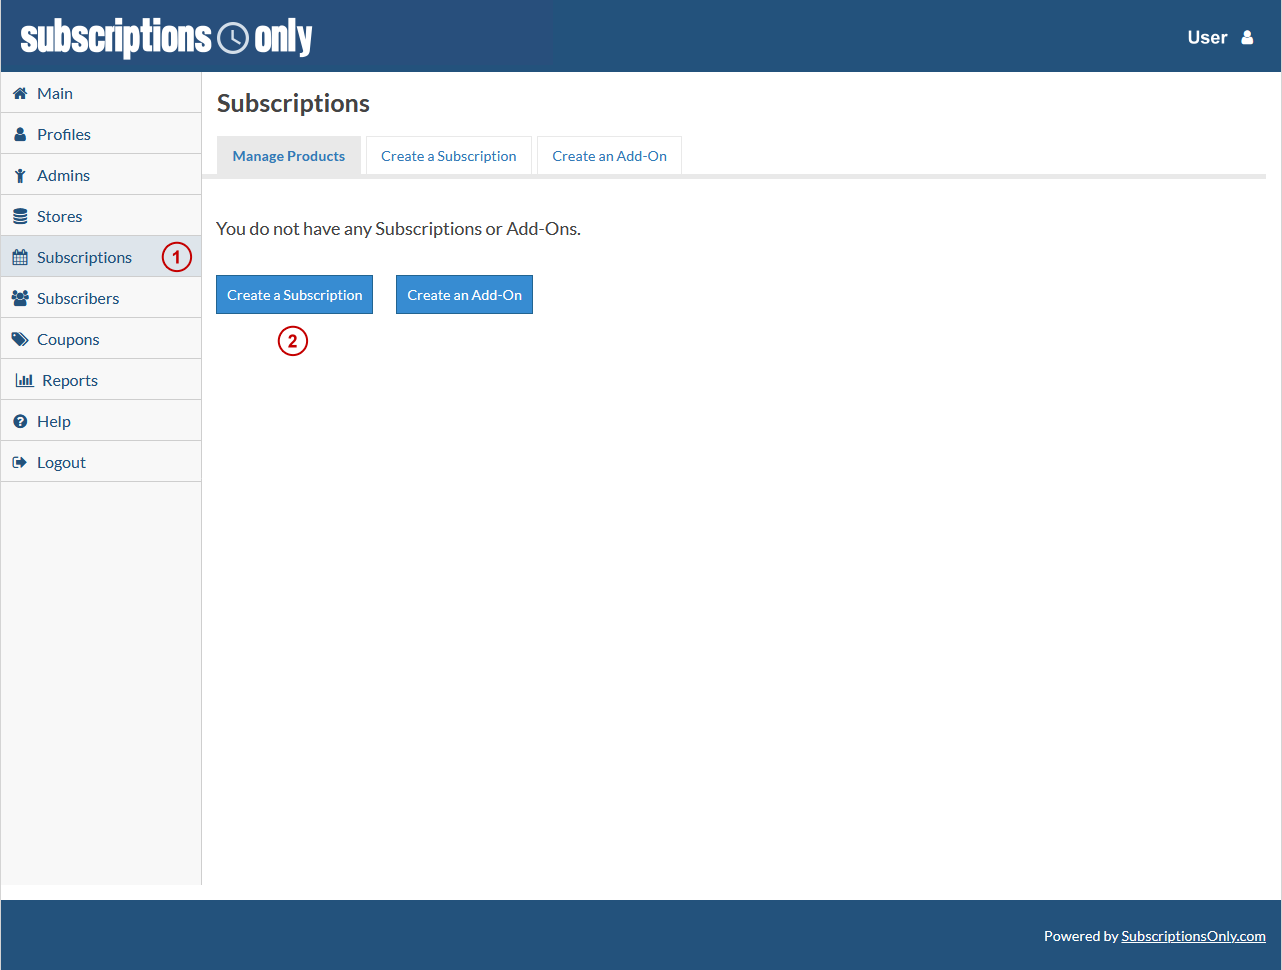
Sign in to the Seller Dashboard and click Subscriptions (1), then Create a Subscription (2).
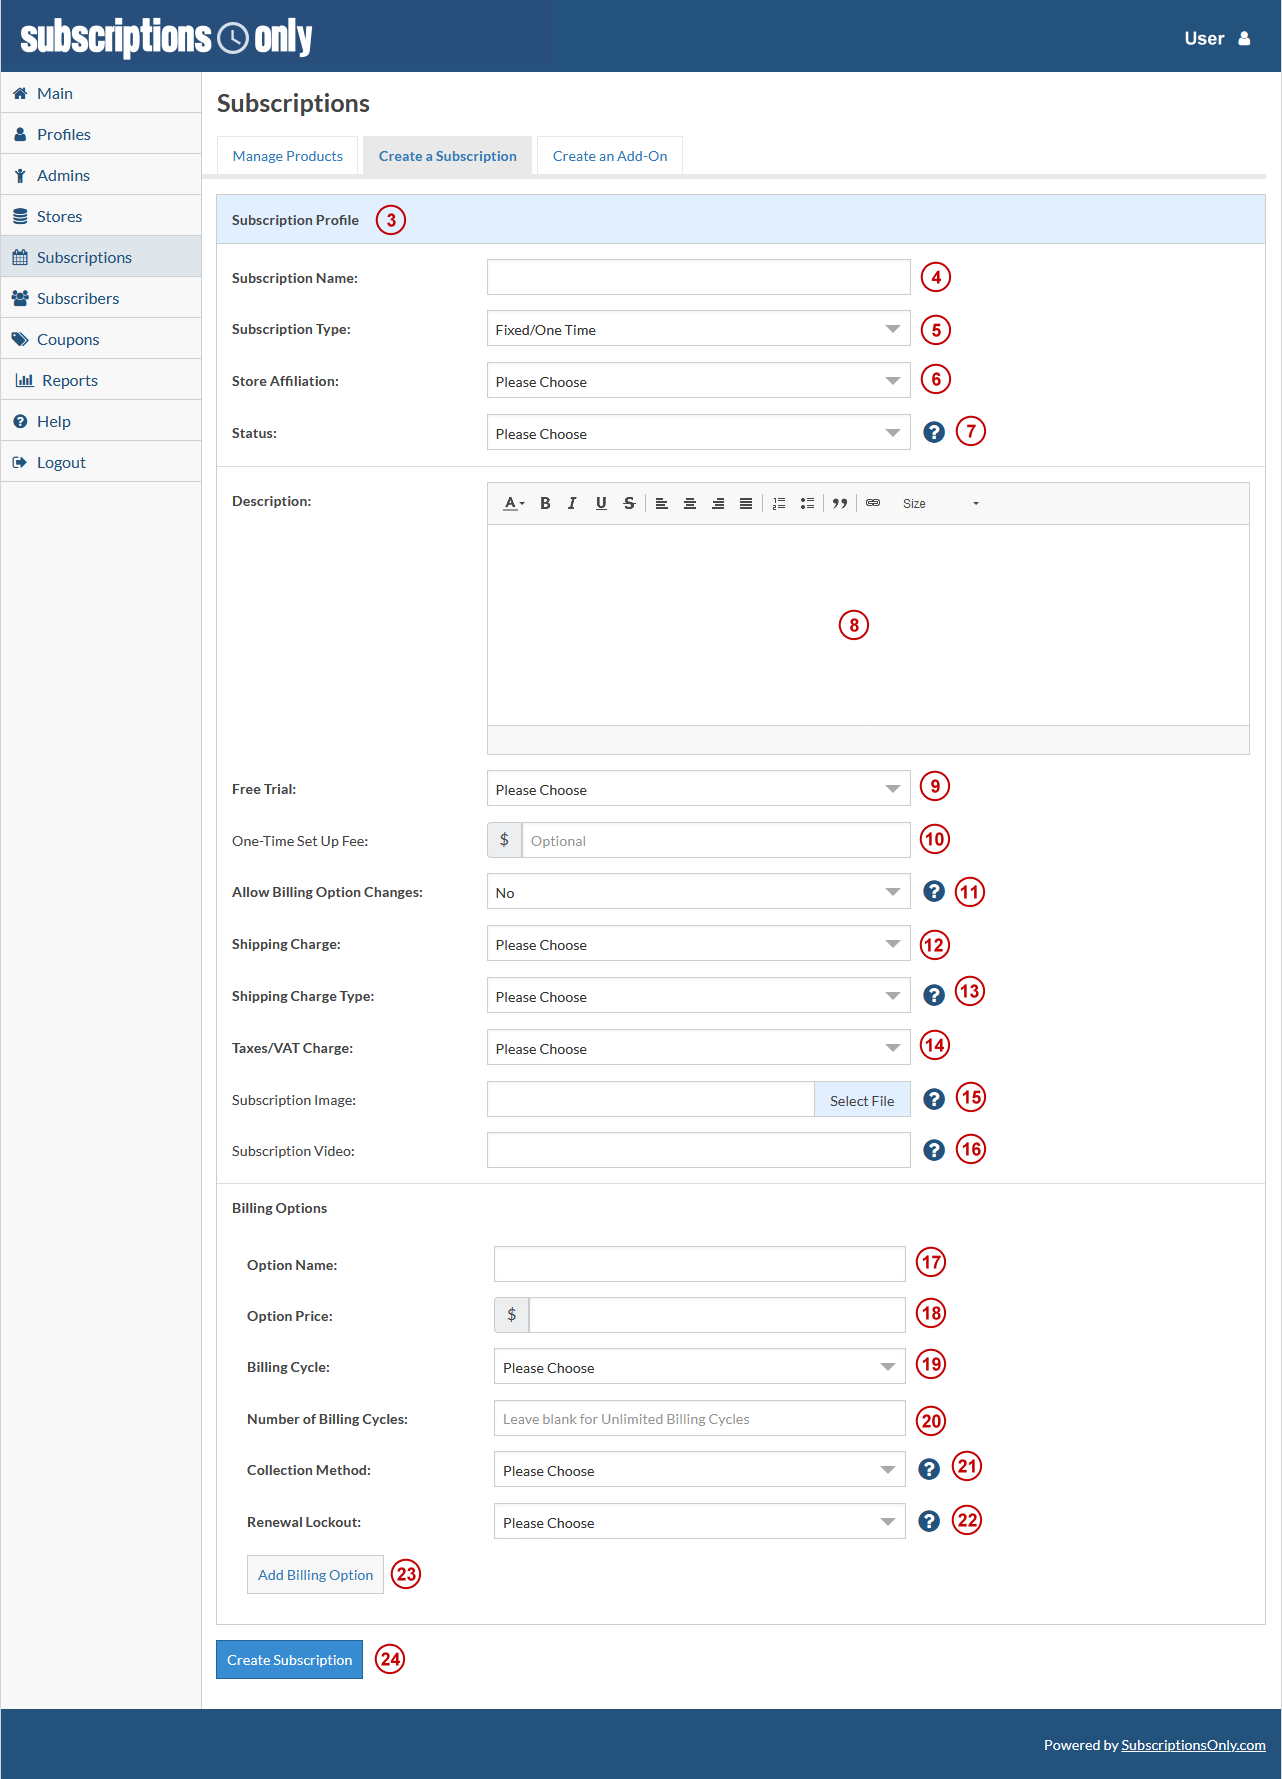
After clicking Create a Subscription you’ll be presented with the basics of the Subscription Profile (3). After choosing a Subscription Name (4) you’ll be asked for the Subscription Type (5). Upon any choice the page will auto populate with the subscription fields for that particular type of subscription.
Fixed/One Time Subscription Type
The Fixed/One Time Subscription can be either a fixed price for a fixed/unlimited time period or you can set up a One Time Subscription which allows you to charge your customer one time for the life of their Subscription. Fields for this type of Subscription include:
Store Affiliation: This field designates which store the Subscription will be associated with (6).
Status: This field allows you to choose a status of your Subscription as Active or Not Active (7).
Description: This is a description of your Subscription (8).
Free Trial: A Free Trial is just that, a Free Trial of the Subscription. You’ll need to decide the duration of the free trial if you decide to offer it (9).
One-Time Set Up Fee: If you are going to charge a set up fee you will put the amount in here (10).
Allow Billing Option Changes: This feature allows you to decide if your subscribers are allowed to change their selected billing option if multiple billing options are available (11).
Shipping Charge: If you charge shipping for your Subscription this is the switch to turn it on and off (12).
Shipping Charge Type: This field is only required if you are charging shipping (13). This field will allow you choose the shipping option type you would like applied to this Subscription. These options are created in the Edit Store Page.
Taxes/VAT Charge: This field is only required if you are charging tax (14). This field will allow you to charge tax for the Subscription. These options are created in the Edit Store Page.
Subscription Image: Adding images to represent your product can be tricky (15). While your product images can be any size, for the best visual results, we recommend using images that are at least 640px by 360px. There will be three image files generated from a single image including a small, medium, and large. The large image will be the image you are uploading now. If no image is uploaded a default image will be used.
Subscription Video: When provided, video fields must be valid YouTube or Vimeo URL's (16). Please DO NOT use embed code, it will not work because SO does the embedding already.
The Billing Options Area lets you define your Subscription pricing, cycle and collection method. Fields for this area include:
Option Name: This field is the actual name of the option (17).
Option Price: This field is the cost of the option that you are creating (18).
Billing Cycle: This field allows you to choose a billing cycle from the drop down or make a custom cycle (19).
Number of Billing Cycles: This field allows you to choose the number of billing cycles for your Subscription or you can leave it blank for unlimited (20).
Collection Method: This field allows you to choose how to collect subscription fees, either Automatically, Invoice Me, or Both (21). When choosing Both know that your buyer will have a choice in their collection method. The Invoice Me (Manual Online Billing) feature is designated to Enterprise and White Label Service Plans. Service Plans can be adjusted in your Account Profile.
Renewal Lockout: This field allows you to choose if the Subscription can be renewed or not (22). You can make this option either enabled or disabled. When Renewal Lockout is enabled, subscribers will NOT be able to renew their subscriptions, and their subscriptions will silently be canceled once they expire. When Renewal Lockout is disabled, subscribers will be able to renew their subscriptions so they don't expire.
You now need to choose if you want multiple billing options. If you do then click the Add Billing Option button (23) and repeat what you just did but for the new billing option.
When you are done filling in all of the information for your Subscription click Create Subscription (24).
Seat Based Subscription Type
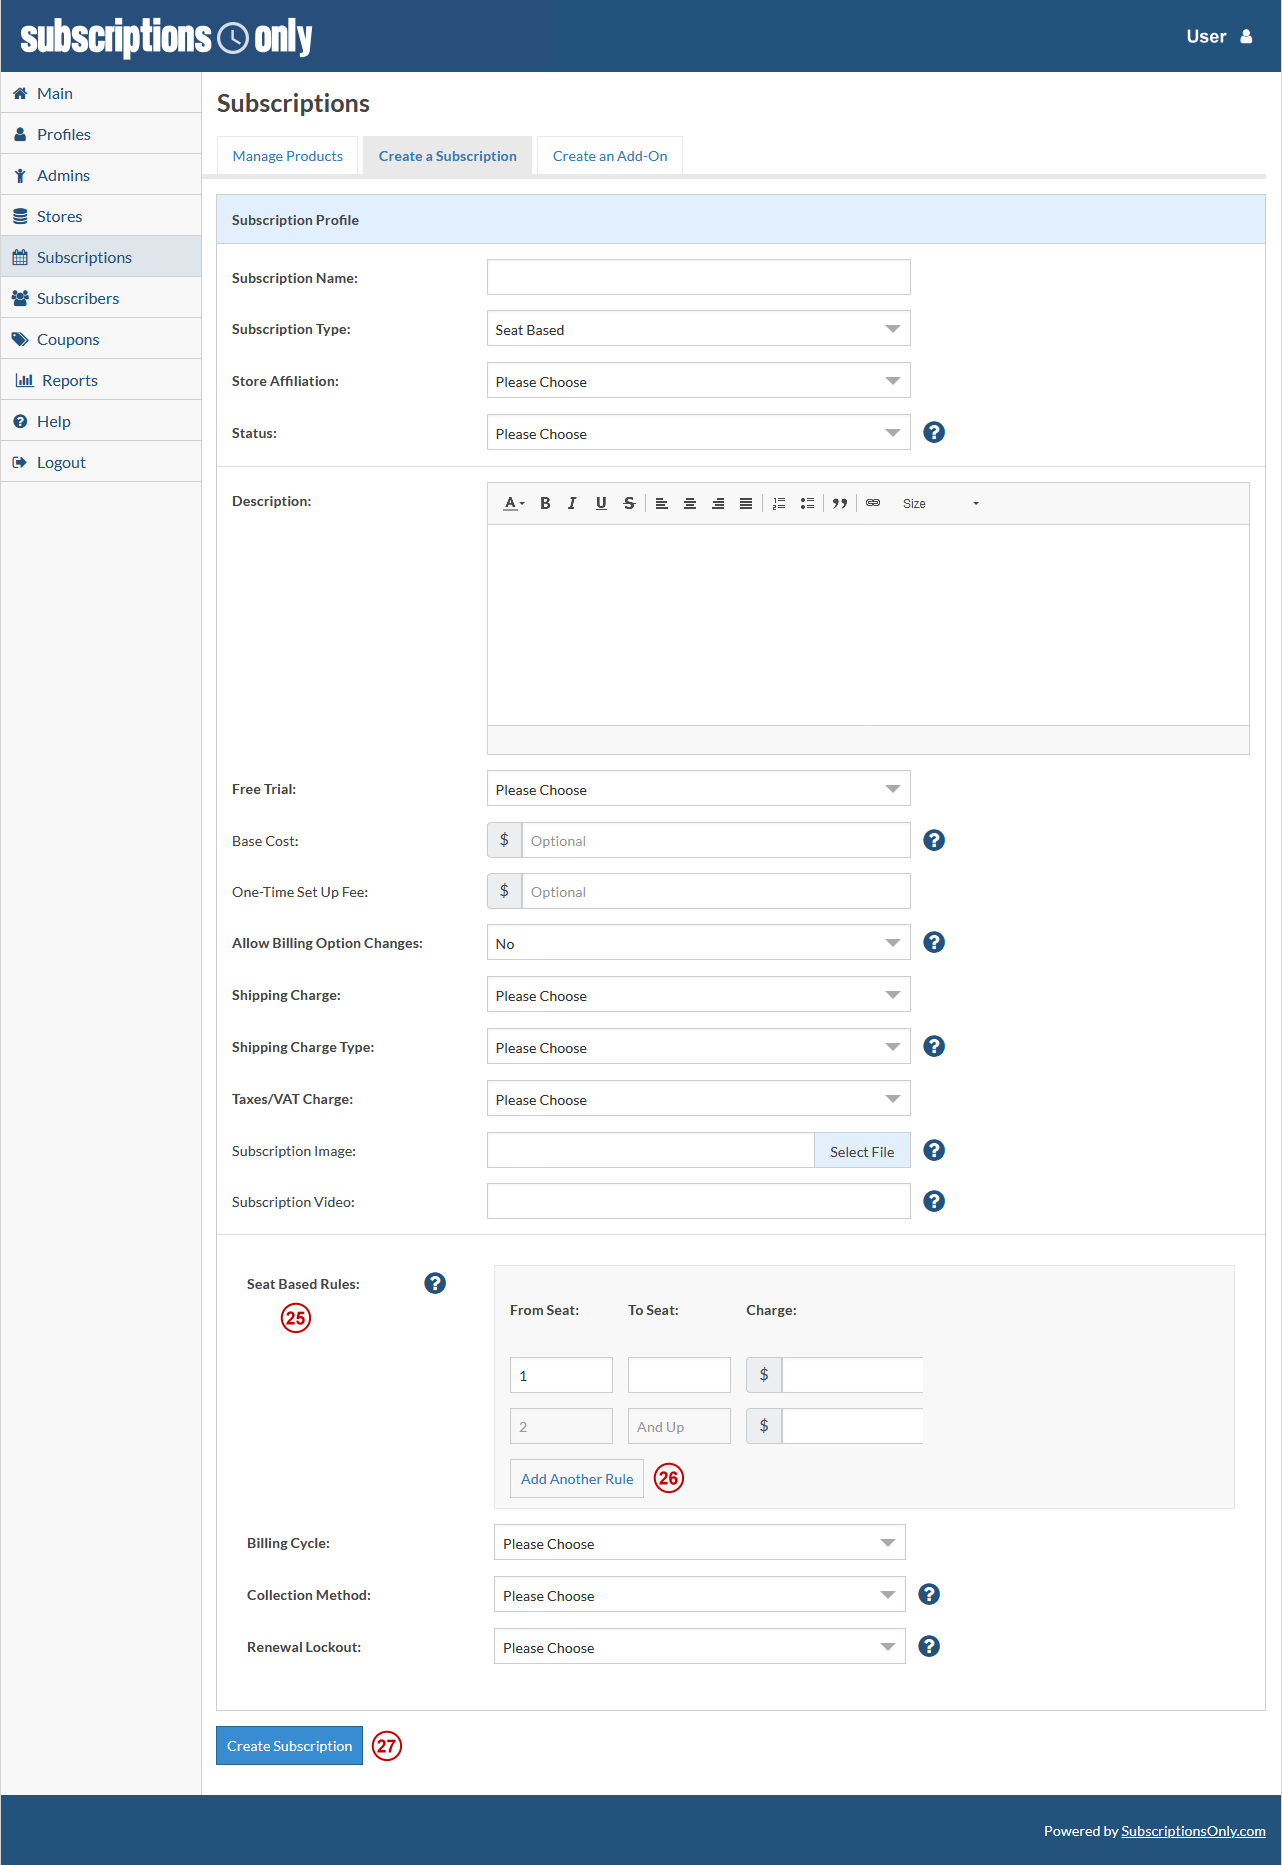
The Seat Based Subscription is designed to allow you to charge based on how many people are using your subscription service.
We will only discuss the Seat Based Rules area (25) as the basic subscription profile (Subscription Name, Store Affiliation, etc...) are the same on all subscription types.
Seat Based Rules allow you to set a price of your choosing by the number of users using your subscription services. Add as many rules as desired. The last rule will always be "And Up". Please make sure to provide details in your description above. You can add as many rules as you'd like by clicking Add Another Rule (26). Each time a user is added or subtracted to/from the Subscription the amount charged will be commensurate. You can also charge a base cost in addition to the seat based charges.
The other fields (Billing Cycle, Collection Method, and Renewal Lockout) are the same on all Subscription types.
After completing all of the pertinent fields click Create Subscription (27).
Usage Based Subscription Type
The Usage Based Subscription is designed to allow you to charge based on the usage of your Subscription service.
We will only discuss the Usage Based Rules area (28) as the basic subscription profile (Subscription Name, Store Affiliation, etc...) are the same on all Subscription types.
Usage Based Rules allow you to set a price of your choosing by the amount of usage your subscriber users. Add as many rules as desired. The last rule will always be "And Up". Please make sure to provide details in your description above. You can add as many rules as you'd like by clicking Add Another Rule (29). You can also charge a base cost in addition to the seat based charges.
Usage has to be provided by you each month (manually or via our API) for each subscriber in order to charge the usage.
The other fields (Billing Cycle, Collection Method, and Renewal Lockout) are the same on all Subscription types.
After completing all of the pertinent fields click Create Subscription (30).

Remember any field labels that are BOLD are required.
What are the blue circles with Question Marks ()? We call them On Page Tutorials or OPT’s. They are full of information about the field or fields you are working with.
Creating an Add-On
In addition to Subscriptions, Subscriptions Only offers the ability to sell Add-On Products. Add-On Products can be selected as your customer purchases a Subscription. An Add-On Product can be anything you want it to be. In this tutorial we’ll discuss Creating An Add-On, here’s how.
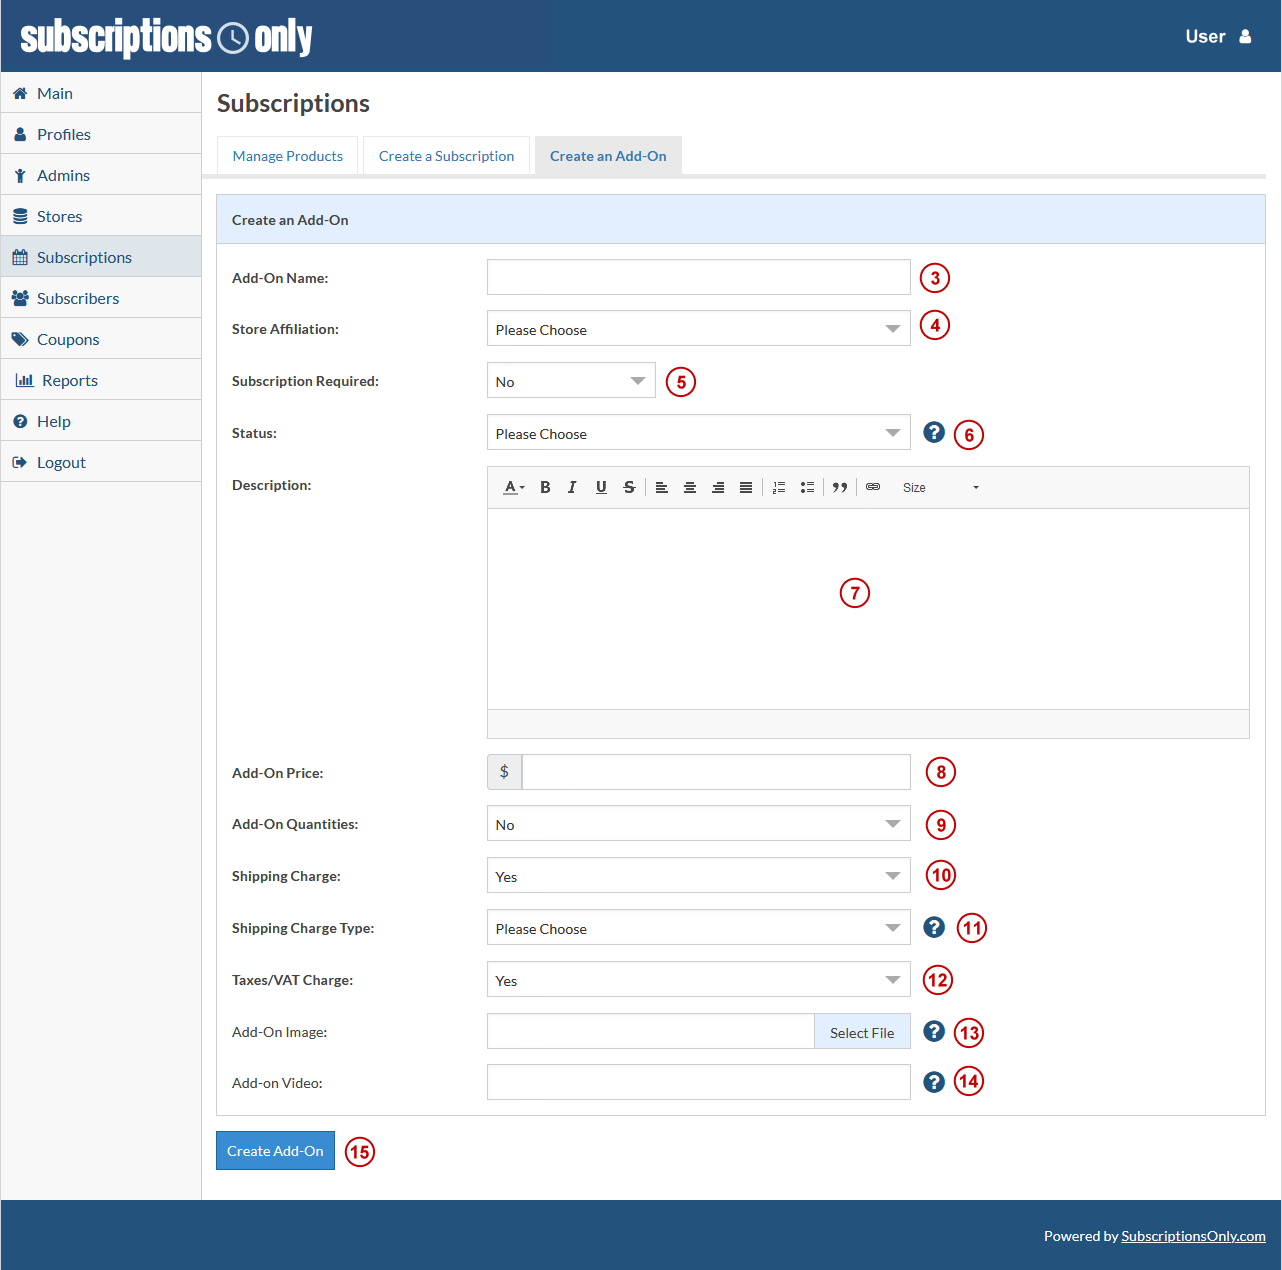
Sign in to the Seller Dashboard and click Subscriptions (1), then Create an Add-On (2).

To create an Add-On you will need to populate each field as desired. Fields include:
Add-On Name: This will be the name of your Add-On (3).
Store Affiliation: This field designates which store the Subscription will be associated with (4).
Subscription Required: If a Subscription purchase is required for this field will designate that requirement (5). If you choose Yes you’ll have to choose the Subscription that is required to purchase this Add-On.
Status: This field allows you to choose a status of your Add-On as Active or Not Active (6).
Description: This is a description of your Add-On (7).
Add-On Price: This is the price of your Add-On (8).
Add-On Quantities: This feature tells the system how many Add-Ons are allowed to be purchased. If No is chose, the quantity is unlimited (9).
Shipping Charge: If you charge shipping for your Add-On this is the switch to turn it on and off (10).
Shipping Charge Type: This field is only required if you are charging shipping (11). This field will allow you choose the shipping option type you would like applied to this Add-On. These options are created in the Edit Store Page.
Taxes/VAT Charge: This field is only required if you are charging tax (12). This field will allow you to charge tax for the Add-On. These options are created in the Edit Store Page.
Add-On Image: Adding images to represent your product can be tricky (13). While your product images can be any size, for the best visual results, we recommend using images that are at least 640px by 360px. There will be three image files generated from a single image including a small, medium, and large. The large image will be the image you are uploading now. If no image is uploaded a default image will be used.
Add-On Video: When provided, video fields must be valid YouTube or Vimeo URL's (14). Please DO NOT use embed code, it will not work because SO does the embedding already.
When you are done filling in all of the information for your Subscription click Create Add-On (15).
Note that Add-Ons are ONE TIME purchases.
Remember any field labels that are BOLD are required.
What are the blue circles with Question Marks ()? We call them On Page Tutorials or OPT’s. They are full of information about the field or fields you are working with.
Managing Products
Managing Subscriptions & Add-Ons is very simple. Here’s how.
Sign in to the Seller Dashboard and click Subscriptions (1), you’ll then see a list of your products (Subscriptions and Add-Ons) (2).
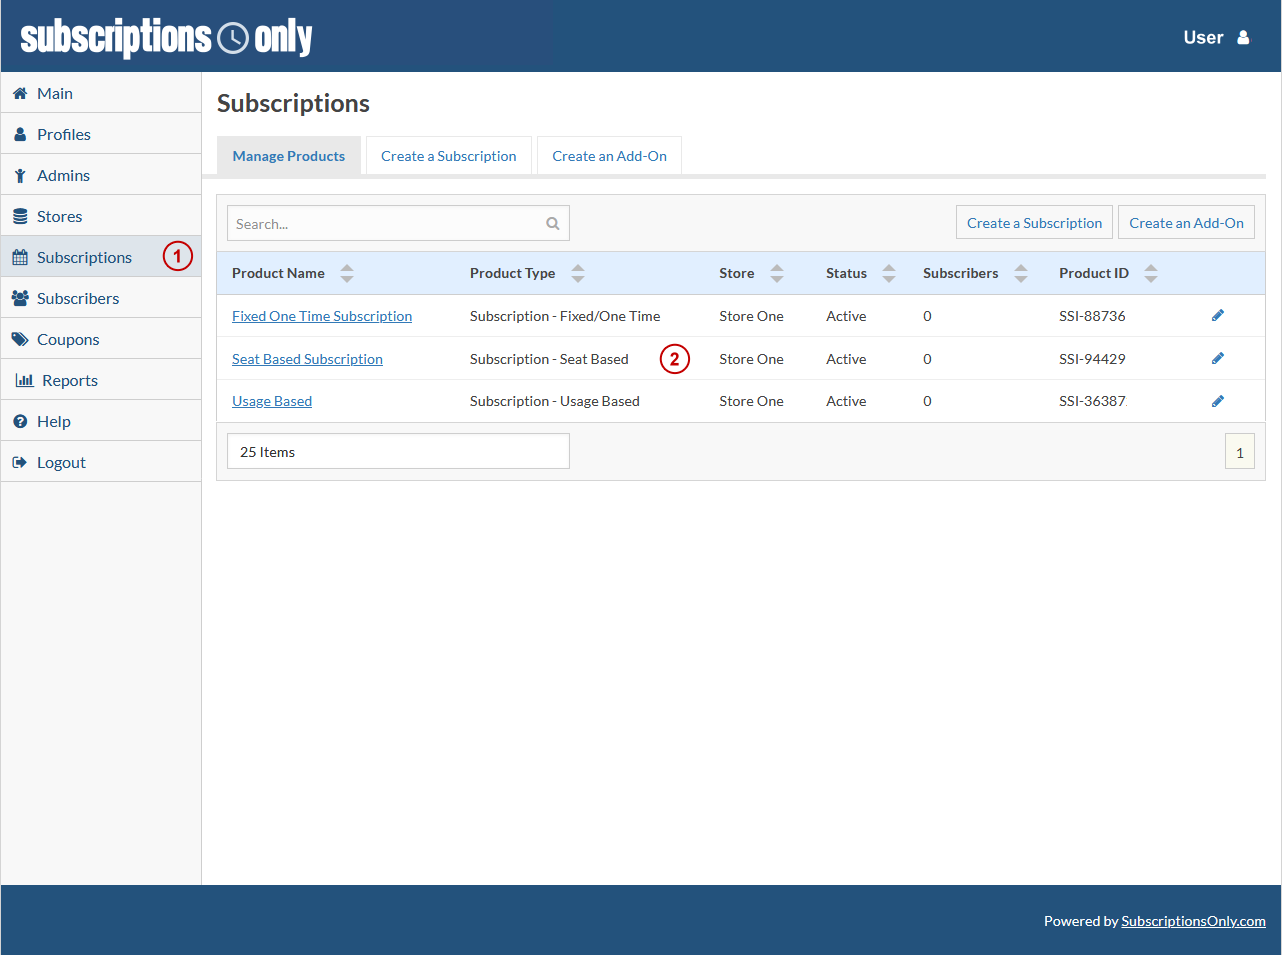
After choosing the product you want to manage/edit you’ll be quickly transported to that product so that you can make adjustments.
You’ll be able to edit any field that is not grayed out. All of the other fields are the same fields that you filled in when you originally created the product. After all the updates are complete, click Save Changes.
Deleting a Product (Subscriptions & Add-Ons)
To delete a product you first need to mark it as inactive. To do this, you need to go to the actual product and change the Status from Active to Inactive, then click Save Changes. Then go back to the main subscriptions page to the product list. Click the icon and a pop up will appear confirming you want to delete your Subscription.
Note If you have languages enabled on your store, any changes you make to your products will need to be updated in your language files. See our article on Updating a Translation here for more help.
How Renewals Work
How Automated Renewals Work
This article discusses how automated renewals work and interact with Email Communications.
Email 1 – Reminder Email: This email goes out at 24 hours prior to renewal. The status of the subscriber and subscription remains active. This status of this specific email must be active to be sent (Stores > Email Communications).
Email 2 – Automated Renewal Confirmation Email: If the renewal transaction is successful this email is sent. If the transaction fails our dunning rule policies will start and email 3 will be sent.
Email 3 - Automated Renewal - Renewal Failed Email: This email goes out when the charge has failed. The dunning process if applicable starts now. This email will continue to be sent until the subscription is canceled or until it successfully charges via the dunning rules attempts within 30 days. At this stage we also allow subscribers to renew from within the Seller Dashboard. This status of this specific email must be active to be sent (Stores > Email Communications).
Email 4 - Subscription Cancellation Email: Once Dunning Rules have been exhausted we send this email. Status changes to canceled for that subscriber and subscription. At this point the status cannot be changed and the customer will have to create a new subscription. This email is always sent.
For information about, to view actual email templates, and set email status’ click here.
How Invoice Me (Manual Online Billing) Works
Email 1 - Manual Renewal Reminder Email: This email goes out at 30 days prior to renewal. Renewals can be paid by clicking the link in the email which leads to a dedicated renewal page in the Subscriber Dashboard. Status remains active for that subscriber and subscription. This status of this specific email must be active to be sent (Stores > Email Communications).
Email 2 - Manual Renewal Reminder (24 Hours) Email: This email goes out at 24 hours prior to renewal. The status of the subscriber and subscription remains active. This status of this specific email must be active to be sent (Stores > Email Communications).
Email 3 - Manual Renewal Confirmation Email: If the renewal transaction is successful this email is sent. If the transaction fails our dunning rule policies will start and email 4 will be sent.
Email 4 - Manual Renewal - Past Due Email: This email goes out at 24 hours after non-renewal. Renewals can be paid by clicking the link in the email which leads to a dedicated renewal page in the Subscriber Dashboard. Status remains active for that subscriber and subscription. This email is always sent.
Email 6 - Subscription Cancellation: This email goes out at 24 hours after email 4. Renewal is no longer available via the Subscriber Dashboard. Status changes to canceled for that subscriber and subscription. At this point the status cannot be changed and the customer will have to create a new subscription. This email is always sent.