Creating a Store
To create a Store sign in to the Seller Dashboard and click Stores (1). From there click the Create Store tab (2).
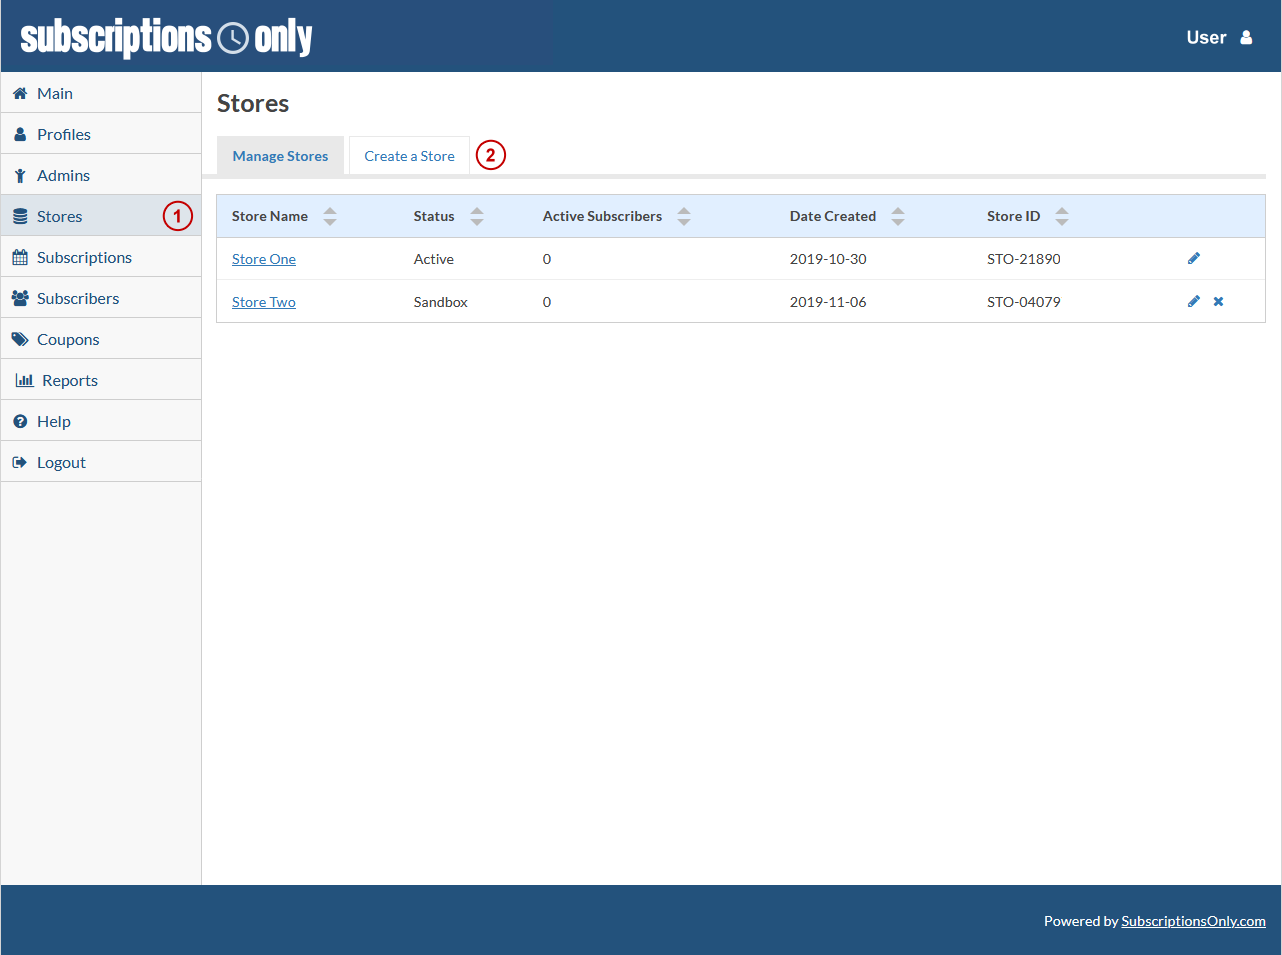
The system will load the basic store setup fields including Store Status and Basic Store Information. Our Sandbox Status will allow you to test all of your store settings in a completely worry free environment.
After completing the form click Create Store (3).
Once that is clicked you'll want to get into the details of your store, just follow the tutorials below for more information.

Remember any field labels that are BOLD are required.
What are the blue circles with Question Marks ()? We call them On Page Tutorials or OPT’s. They are full of information about the field or fields you are working with.
Note the information you provide in this screen will be shown to buyers on hosted store pages, confirmation pages, and email communications.
Store Management
To manage a Store sign in to the Seller Dashboard and click Stores (1). From there choose the store you want to manage and click the icon (2). The can be used to delete a store if desired.
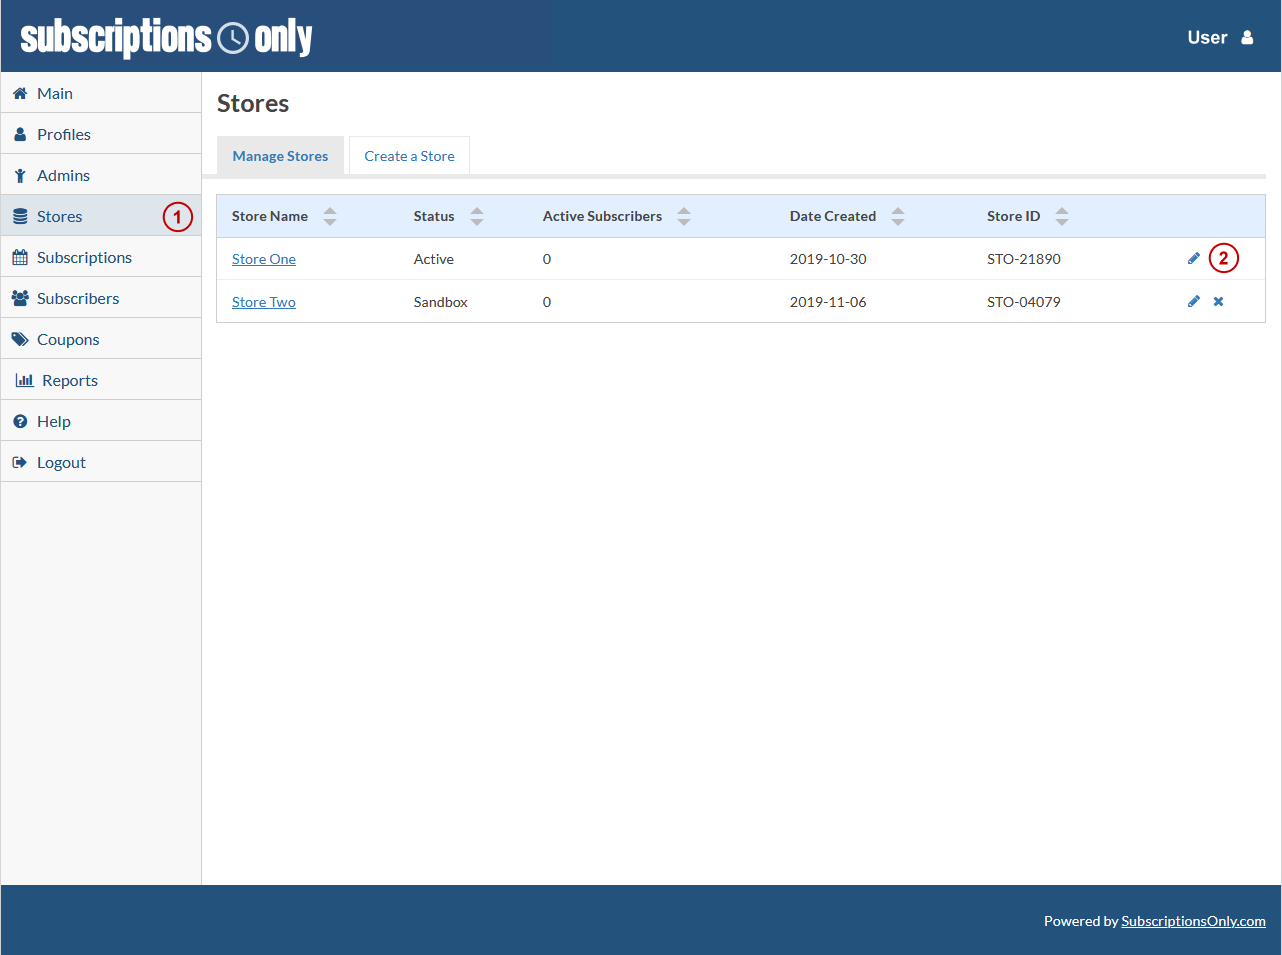
After choosing the page will refresh with the chosen store management areas as shown here. Just choose what area you want to manage by clicking the down arrow (3).
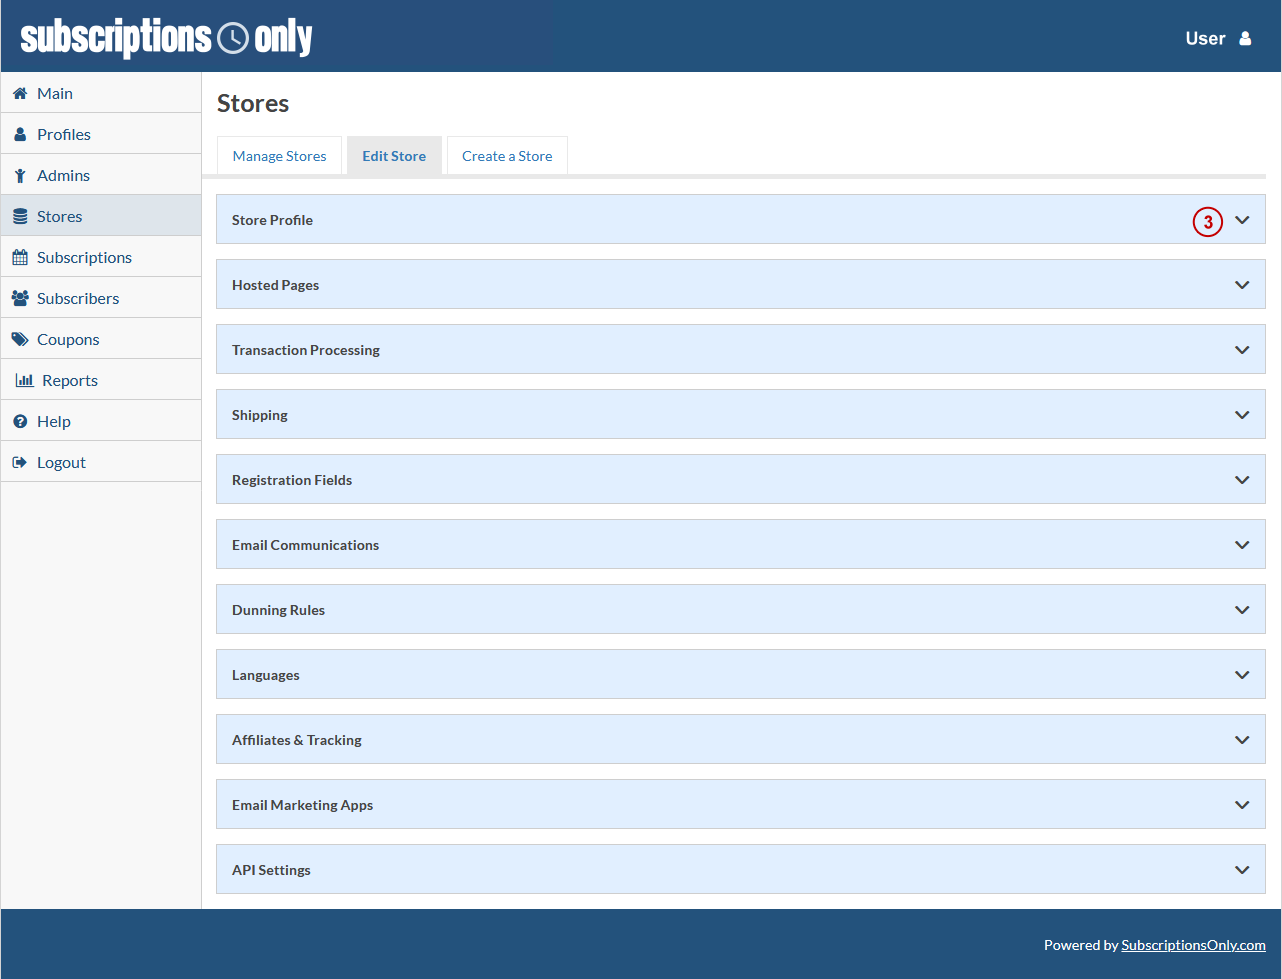
Store Profile
To manage a Store Profile sign in to the Seller Dashboard and click Stores from the left Menu then choose the store you want to manage and click the icon.
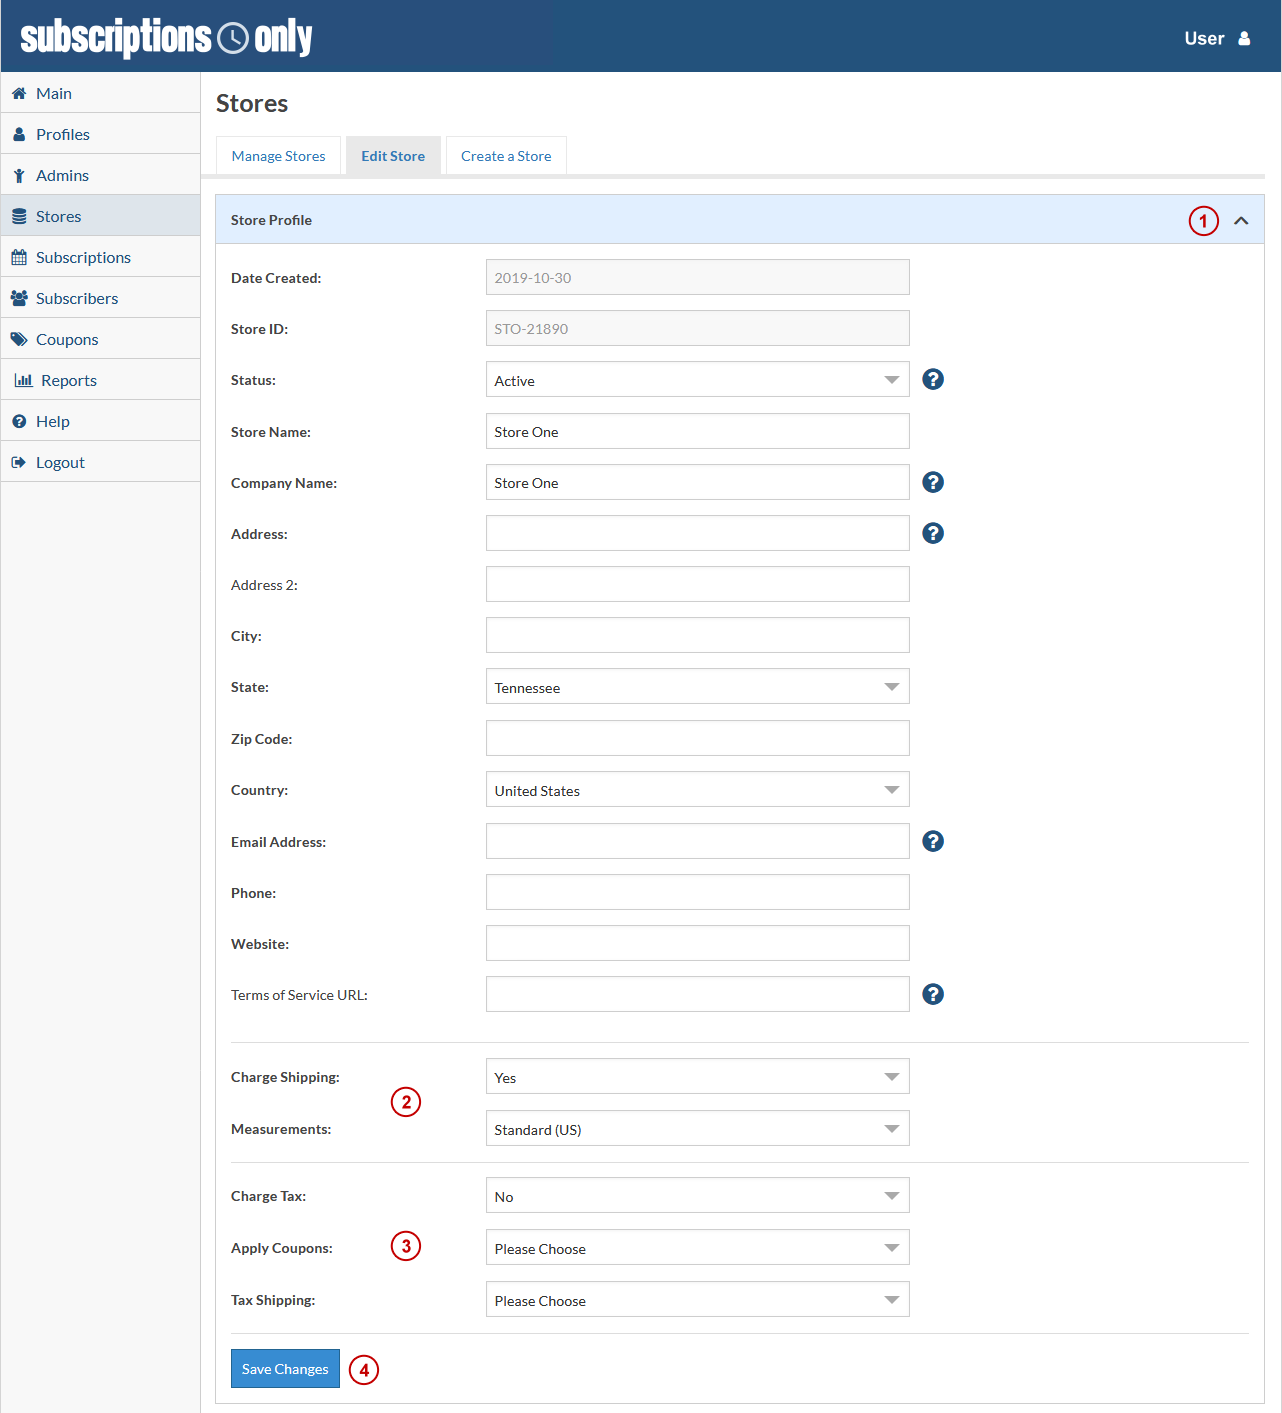
You’ll land on the Store Management page, click Store Profile (1) and the area will expand. You’ll notice most of the information is already populated which is because this data is what you used when setting up the store, now you can edit it as desired.
New areas that need attention are Shipping (2) and Taxes (3).
For Shipping just tell the system if you want to apply shipping charges to the store. Don’t worry because shipping can be defined in the shipping area as well as at the product level. You’ll want to use the measurements that make sense for your customers.
For Taxes just tell the system if you want to charge tax or not as well as when to apply coupons and if want your shipping charges to be taxed.
Once all of your adjustments are complete click Save Changes (4).
Note that if you choose to charge taxes and/or shipping their respective areas below will need attention.
Remember any field labels that are BOLD are required.
What are the blue circles with Question Marks ()? We call them On Page Tutorials or OPT’s. They are full of information about the field or fields you are working with.
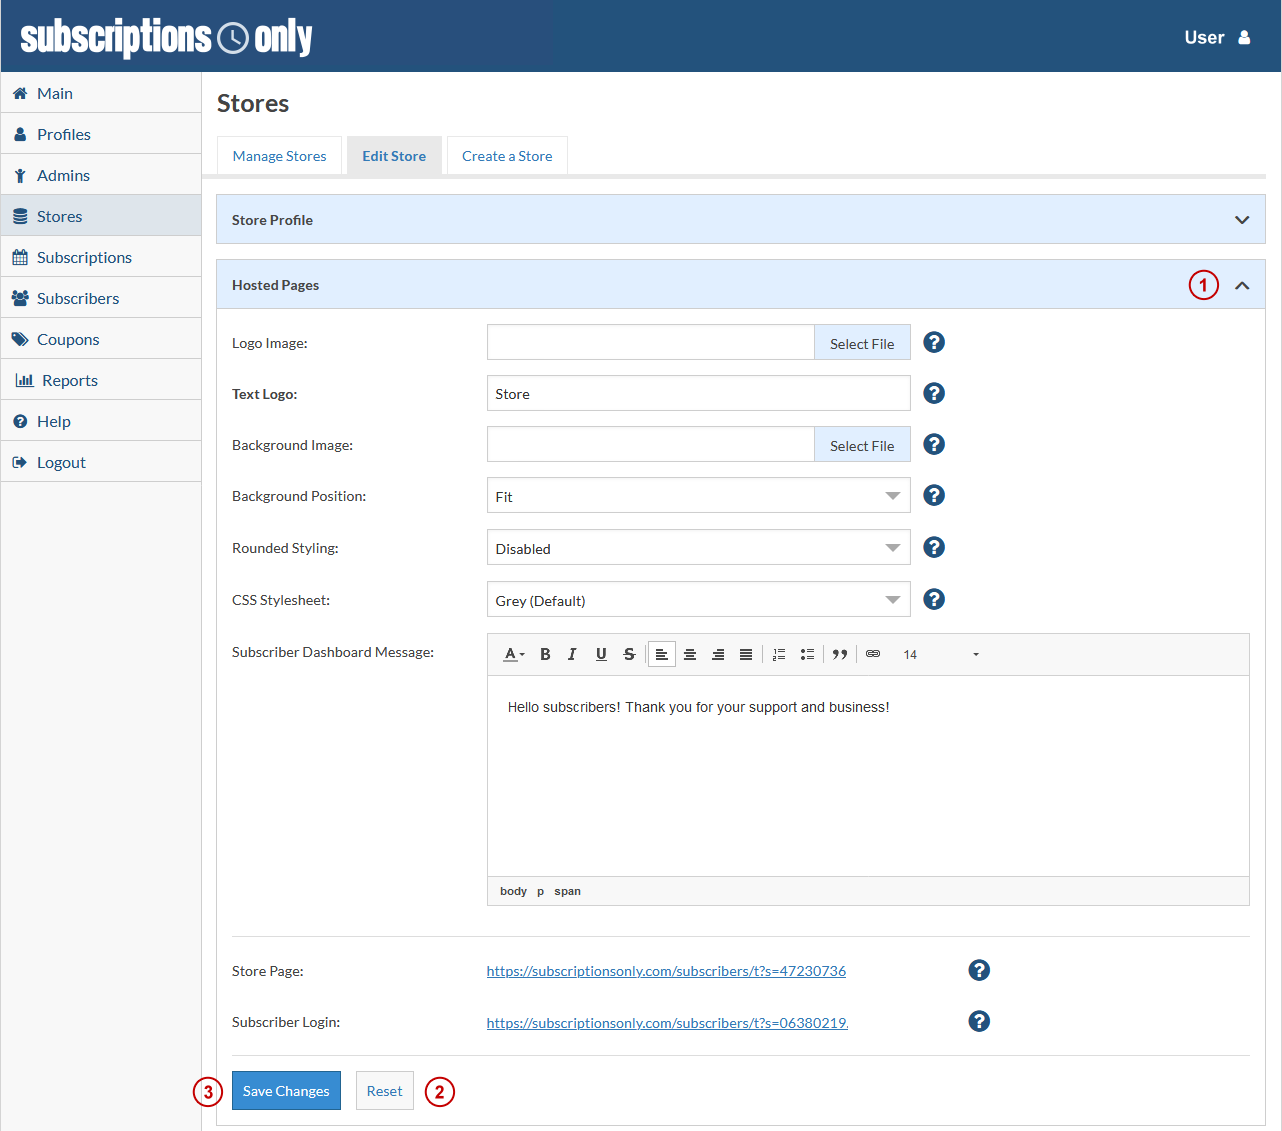
Hosted Pages
To manage your stores Hosted Pages sign in to the Seller Dashboard and click Stores from the left Menu then choose the store you want to manage and click the icon.
You’ll land on the Store Management page, click Hosted Pages (1) and the area will expand.
Field explanations and helpful information
Logo Image: Your logo can be any size up to 600 pixels wide by 100 pixels tall. Using a logo with a transparent background will yield the best visual results. The maximum file size is 15 MB.
Text Logo: You can use text instead of a logo. If you use a logo and text, the text will be applied to the logo images alt tag. The alt tag is an HTML attribute used to provide additional information about the image when the image cannot be displayed or a user is using a screen reader.
Background Image: While your background image can be any size or color, it is best if you use a seamless background pattern or gradient, so your store will look good in all browser sizes and screen resolutions.
Background Position: Here you have 5 options for your background image position: tile both, tile horizontal, tile vertical, stretch (stretches the image horizontally and vertically) and fit (makes the image look centered).
Rounded Styling: When enabled, rounded styling will add aesthetically pleasing rounded corners to most boxes, buttons, and other elements in your store. This setting is strictly personal preference, and sellers are encouraged to use whatever choice they find the most visually appealing.
CSS Stylesheet: You can choose a pre-built CSS stylesheet to enhance the appearance of your store, or you can customize your own stylesheet. Custom stylesheets are intended for advanced users and developers. Your choices for a pre-built CSS stylesheet are gray (which is the default), blue or beige.
Subscriber Dashboard Message: This is a message that your subscribers will see when they sign in to their dashboard to view/manage their account.
Reset (2) will reset all of your data for the Hosted pages area.
Once all of your adjustments are complete click Save Changes (3).
Remember any field labels that are BOLD are required.
What are the blue circles with Question Marks ()? We call them On Page Tutorials or OPT’s. They are full of information about the field or fields you are working with.
Transaction Processing
To manage your stores Transaction Processing sign in to the Seller Dashboard and click Stores from the left Menu then choose the store you want to manage and click the icon.
You’ll land on the Store Management page, click Transaction Processing (1) and the area will expand.
When you are first setting up the store you’ll have to choose a payment processor. Options include Stripe, Authorize.net or Trust Commerce (2).
![]()
We’ve chosen Stripe (our preferred payment processor) for this tutorial.
For Stripe you’ll need to have your Live Publishable Key and your Live Secret Key. For more information on how to obtain your Live Keys see this link.
For Authorize.net you’ll need CIM Support activated. You will also need to have your API Login ID and your Transaction Key. For more information on how to obtain your API Login ID and Transaction Key see this link.
For Trust Commerce you’ll need Citadel Support activated. You will also need your Customer ID and your Password in order to save changes. For more information sign in to your “Vault” via this link.
Regardless of the transaction processor being used the currency code (3) and currency symbol (4) will need to be chosen.
Once all of your adjustments are complete click Save Changes (5).
Note your transaction processing choice is written in stone and NOT editable once saved. If a payment gateway change is needed you’ll need to contact customer support via a support ticket.
![]()
Remember any field labels that are BOLD are required.
What are the blue circles with Question Marks ()? We call them On Page Tutorials or OPT’s. They are full of information about the field or fields you are working with.
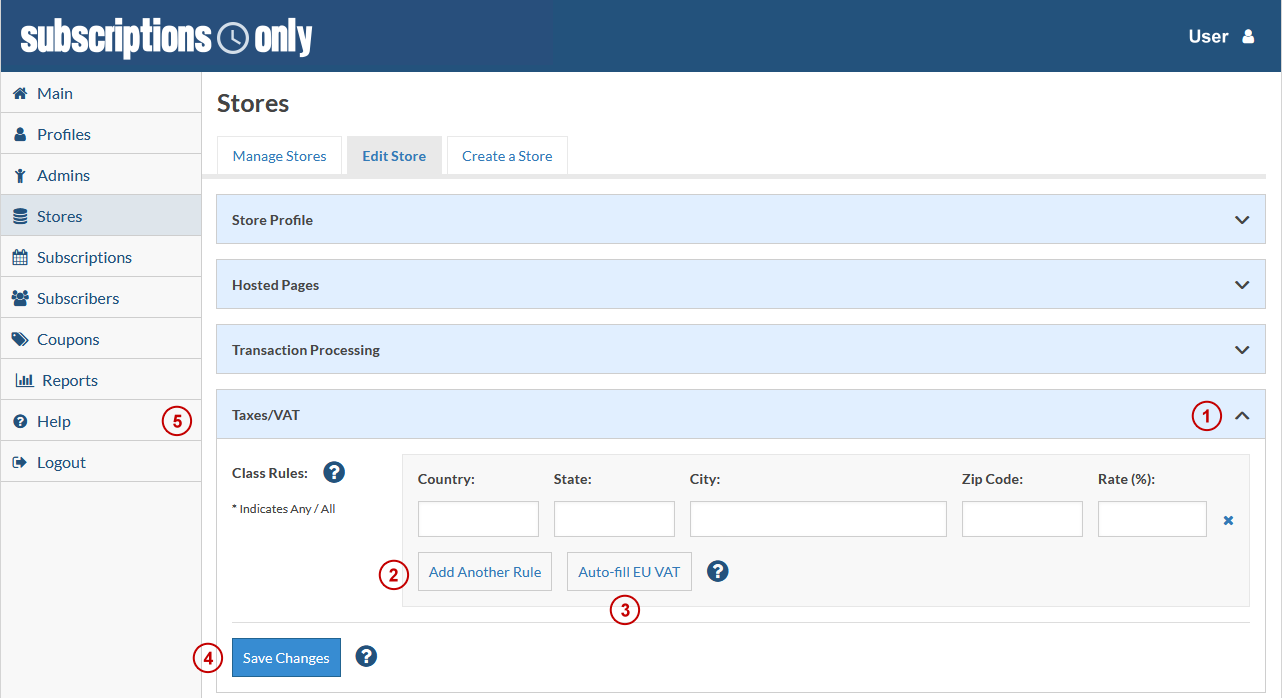
Taxes & VAT
If you choose to charge tax on your products you’ll need to manage those settings, here’s how. Sign in to the Seller Dashboard and click Stores from the left Menu then choose the store you want to manage and click the icon.
You’ll land on the Store Management page, click Taxes/VAT (1) and the area will expand.
You'll need to fill in the Country, State, City, Zip Code and Tax Rate. The Tax Rate is required. Leaving a field blank indicates any/all. You can add multiple rules if needed, by clicking Add Another Rule (2).
Selling to the EU? No problem because we’ve pre-programmed all of the EU Countries tax rates and they auto populate by clicking Auto-fill EU VAT (3).
Note that by putting an asterisk (*) in any field indicates any/all.
When you have all of your tax information completed, click Save Changes (4).
If you have hundreds or even thousands of tax rules that need imported from a spreadsheet or CSV file, we can help! Simply submit a support ticket by clicking Help (5) from the left navigation bar and we'll provide you with a quote to import all of the tax rules for you.
Other areas to consider when using the tax setting.
Master On/Off Settings: Turning taxation settings on/off is managed in the edit Store Profile area.
Product Level Management: Taxes can be turned on/off for a particular product at the product level (Subscription or Add-On).
Remember any field labels that are BOLD are required.
What are the blue circles with Question Marks ()? We call them On Page Tutorials or OPT’s. They are full of information about the field or fields you are working with.
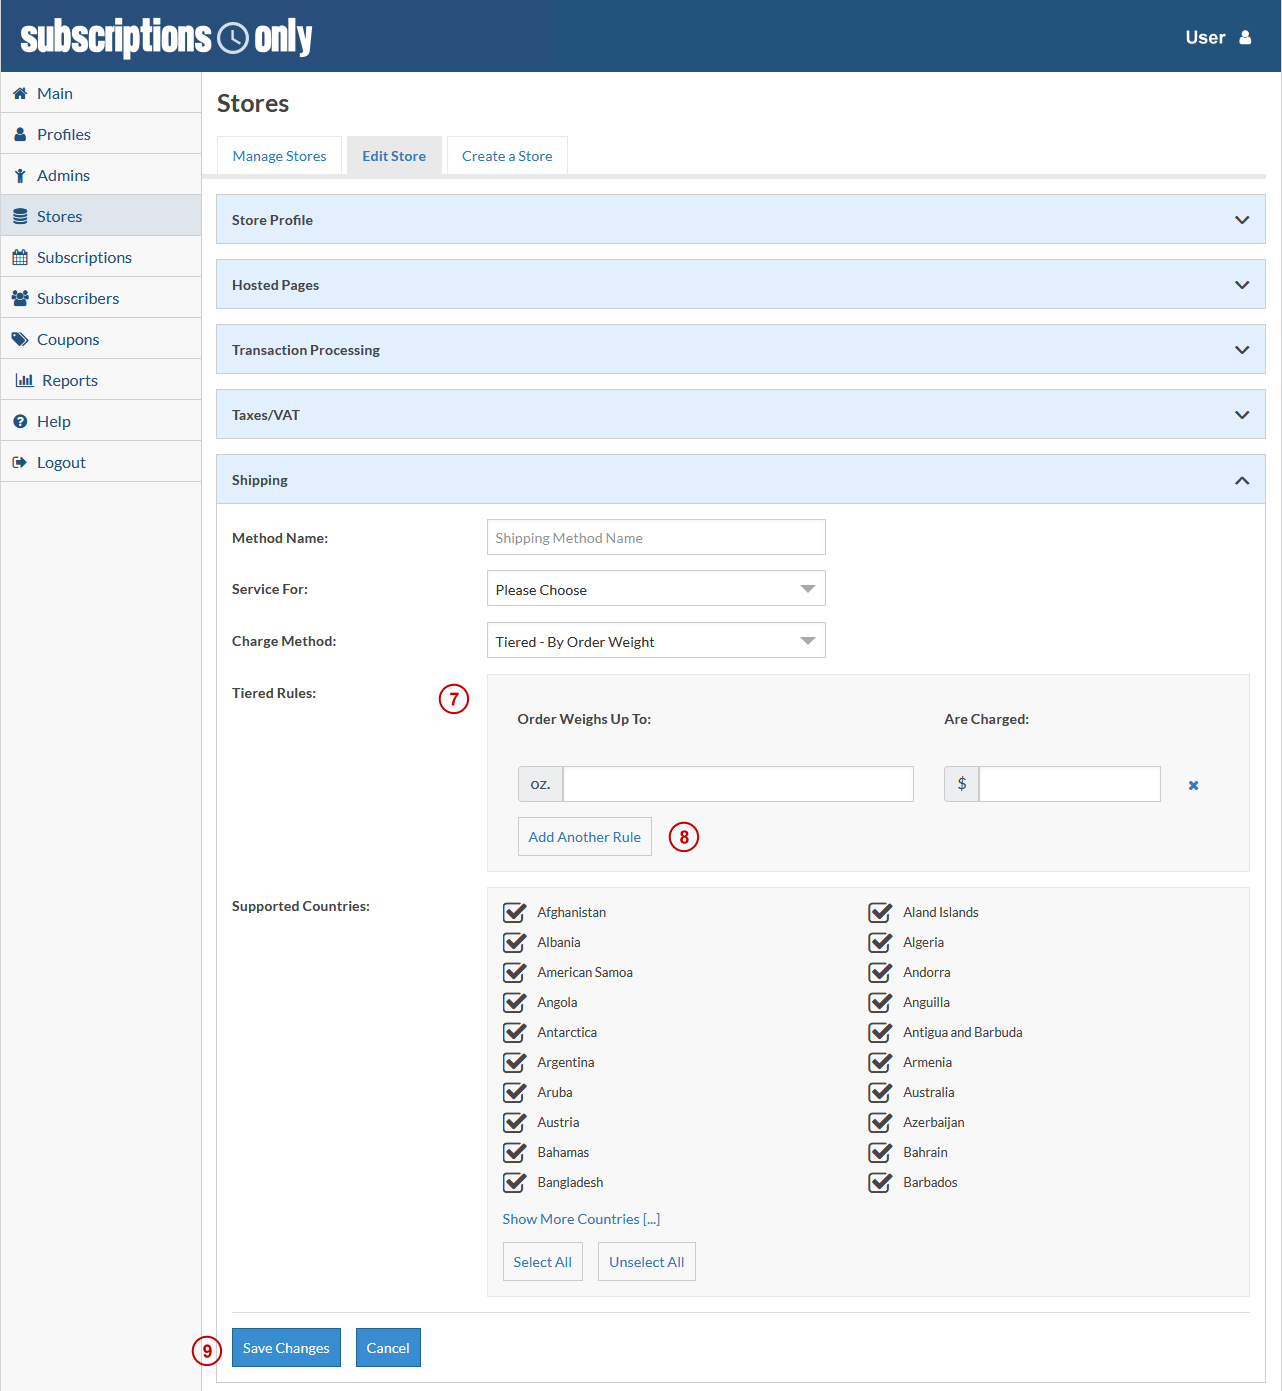
Shipping
Do your products need to be shipped? Here’s how to setup and manage shipping. Sign in to the Seller Dashboard and click Stores from the left Menu then choose the store you want to manage and click the icon.
You’ll land on the Store Management page, click Shipping (1) and the area will expand.
Because multiple shipping methods can be created its important to name your shipping methods (2) that are easy to remember. We also suggest making a list for reference.
To start you’ll choose for whom the shipping is applicable (Domestic, International, or All) (3) and the charge method (Flat Rate, Tiered By Weight or Order Subtotals) (4) and the countries that this method will ship to (5). Once you have all of your information filled out, click Save Changes (6).
Keep reading below for details on how each shipping method works.

There are three different ways to charge for shipping (Shipping Methods).
Flat Rate Shipping: Customers are charged the same for shipping regardless of where it's going, how much the package weighs or how much they have spent on products. To charge a Flat Rate choose it from the drop down and fill in the Flat Rate Charge. This charge can either be a dollar amount or a percent of the order total.
Tiered By Order Weight: Customers are charged a shipping rate based on how much their package weighs. After choosing Tiered - By Order Weight from the drop down, a Tiered Rules section (7) will appear and require that you input the Ounces and Charge Amount. Adding more rules is super simple, just click Add Another Rule (8). This can be repeated as many times desired. An example rule for this option would be Orders up to 32oz. are charged $5 and Orders up to 100oz. are charged $7.50.
Once you have all of your information filled out, click Save Changes (9).
Other areas to consider when using this shipping setting.
Weight Measurements: Weight Measurements are Standard (US) or Metric. This setting can be managed within the edit Store Profile area.
Product Weights: Product Weight settings are managed at the product level) (Subscription or Add-On).
Tiered By Order Subtotals: Customers are charged a shipping rate based on what their subtotal is. After choosing Tiered - By Order Subtotals from the drop down, a Tiered Rules (10) section will appear and require that you input the Subtotal Up To and the Charge Amount. Adding more rules is super simple, just click Add Another Rule (11). This can be repeated as many times desired. An example rule for this option would be a Subtotals Up To $50 are charged $12 and Subtotals Up To $175 are charged $15.
Once you have all of your information filled out, click Save Changes (12).

Note Shipping can also be managed/overwritten at the product level (Subscription or Add-On).
Remember any field labels that are BOLD are required.
What are the blue circles with Question Marks ()? We call them On Page Tutorials or OPT’s. They are full of information about the field or fields you are working with.
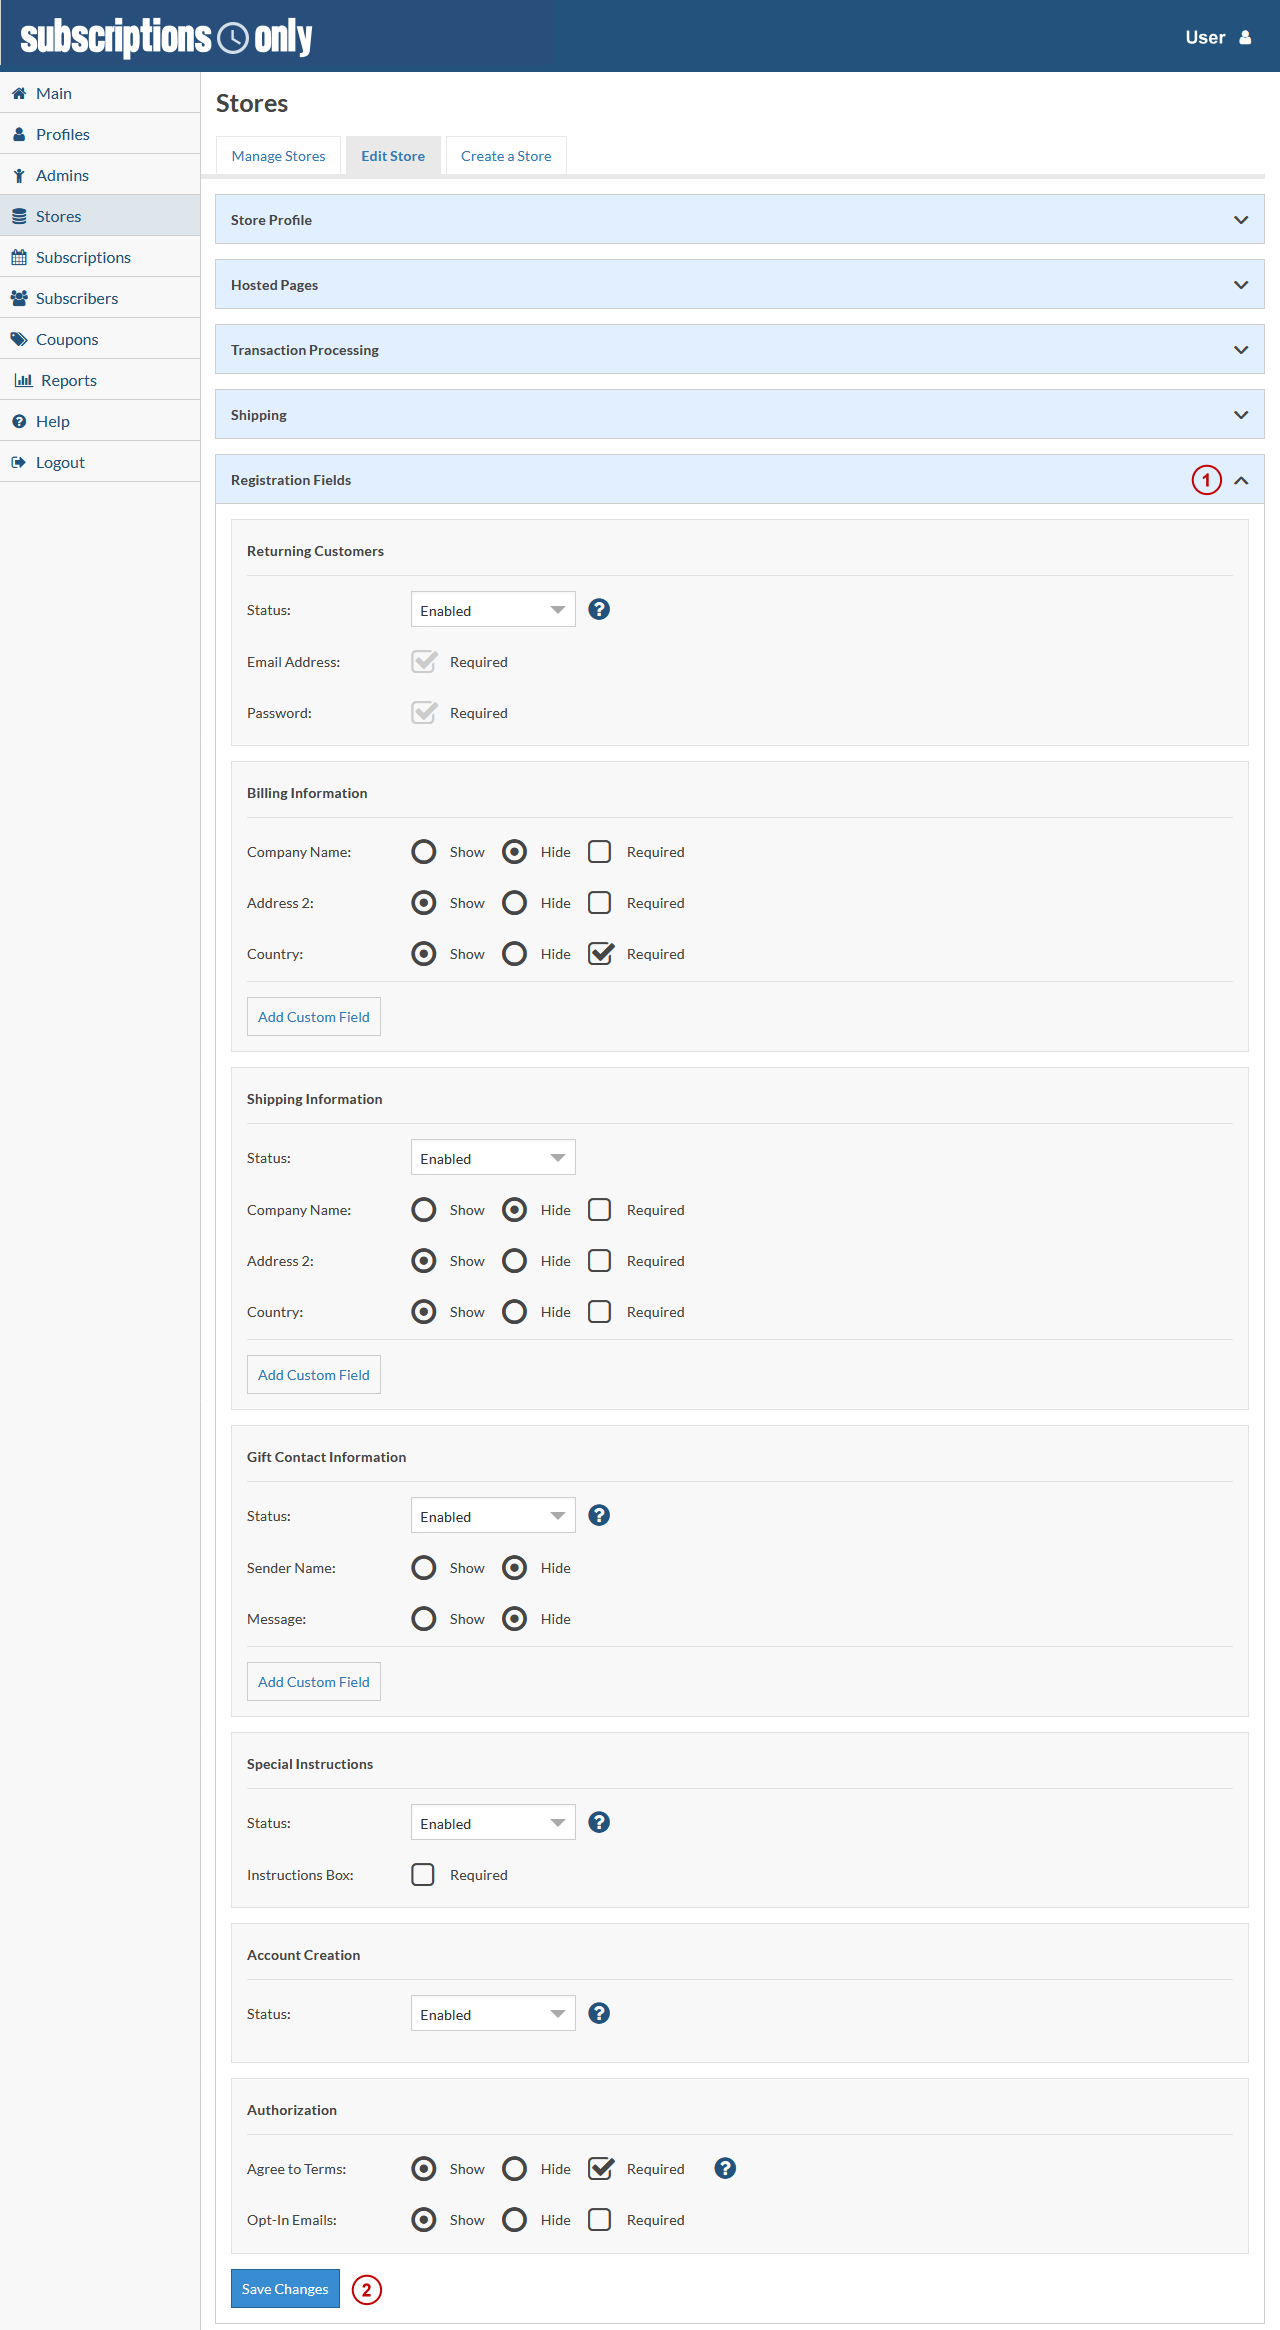
Registration Fields
If you're tired of the standard field sets then you’ve come to the right place. Of course we have our standard fields that we need to process an order but we go one step further and allow custom fields.
To manage the Registration Fields sign in to the Seller Dashboard and click Stores from the left Menu then choose the store you want to manage and click the icon. You’ll land on the Store Management page, click Registration Fields (1) and the area will expand.
There are 7 different sub fields in this section of your dashboard. Each one allows you to enable or disable functions and/or gives you the option to hide, show or require fields to be filled out during the checkout process.
Returning Customers: When Enabled this feature allows Buyers to sign in to pre-populate all checkout fields. When Disabled Buyers will have to fill out the fields manually.
Billing Information: You’ll have the option to make Company Name, Address 2 and Country fields shown or hidden and if they are shown you have the option to make them required. Creating custom fields is also available.
Shipping Information: If you allow shipping you will want this section to be enabled. Again, you are given the option to make Company Name, Address 2 and Country fields shown or hidden and if they are shown the option to make them required. Creating custom fields is also available.
Gift Contact Information: Gift Contact Information allows a buyer to gift a Subscription or Add-On to another person. The Buyer has the ability to list the senders name and a gift message during checkout. Creating custom fields is also available.
Special Instructions: Any important information that is required for the order will go in this field (ex. deliver to downstairs door). You’ll be given the option to have this field required during checkout but note that having this box checked would always require a buyer to fill this out even if they didn't have any special instructions.
Account Creation: This allows buyers to create an account and sign in to a Subscribers Dashboard. Without an account they will not have access to view any order history and various account information.
Authorization: This section allows you to show, hide and/or require a customer to Agree to Terms and to Opt-In to Emails. If you enable the Agree to Terms setting please add a link to your Terms and Conditions in the Store Profile section.
Once all of your adjustments are complete click Save Changes (2).
Email Communications
We’ll be communicating with your buyers via email through our dedicated Amazon Simple Email Service (Amazon SES). It's super fast with unsurpassed deliverability.
To manage the Email Communications sign in to the Seller Dashboard and click Stores from the left Menu then choose the store you want to manage and click the icon. You’ll land on the Store Management page, click Email Communications (1) and the area will expand.
We’ve organized our email communications into easy to understand categories and sub-categories, you can even preview (2) the emails to see how they read.
Optional Outbound Subscriber Emails
This group of emails are set to Active by default but can be turned off if desired by choosing the “Not Active” radio button (3).
Purchase and Renewals
Original Purchase: This email shows what will be sent to anyone buying your Subscription and/or Add-On products.
Automated Renewal Confirmation: This email shows confirmation to buyers that their Subscription renewal was successful.
Manual Renewal Confirmation: This email shows confirmation to buyers that their Subscription renewal was successful.
Billing Changes
Billing Option Charges: This email confirms to buyers that their Subscription billing option has been changed.
Renewal Reminders
Automated Renewal Reminder: This email shows the buyer that their Subscription will automatically renew within 24 hours.
Manual Renewal Reminder: This email tells buyers that pay manually they need to renew their Subscription.
Manual Renewal Reminder (24 Hours): This email tells buyers that pay manually they need to renew their Subscription within 24 hours.
Required Outbound Subscriber Emails
This group of emails are required.
Free Trial Ending Reminders
These email notifications are compliant with Mastercard/Visa rules for Free Trials.
Trial Ending (Automated Renewal): This email tells buyers that their trial Subscription will end in 24 hours. There is nothing for the buyer to do because they renew automatically.
Trial Ending (Manual Renewal): This email tells buyers that their trial Subscription will end in 24 hours. The subscriber will need to pay for renewal within 24 hours.
Renewal Failures and Past Due Renewals (Dunning Rules)
Automated Renewal - Renewal Failed: This email tells the buyer that their Subscription was not able to be renewed.
Manual Renewal - Past Due: This email tells the buyer that their Subscription renewal is past due.
Subscription Cancellation: This email notifies the buyer that their Subscription has been canceled or suspended.
If you made any status adjustments make sure to click Save Changes (4).
Need to customize the text in these emails? Upgrade to White Label for 100% customization.

What are the blue circles with Question Marks ()? We call them On Page Tutorials or OPT's. They are full of information about the field or fields you are working with.
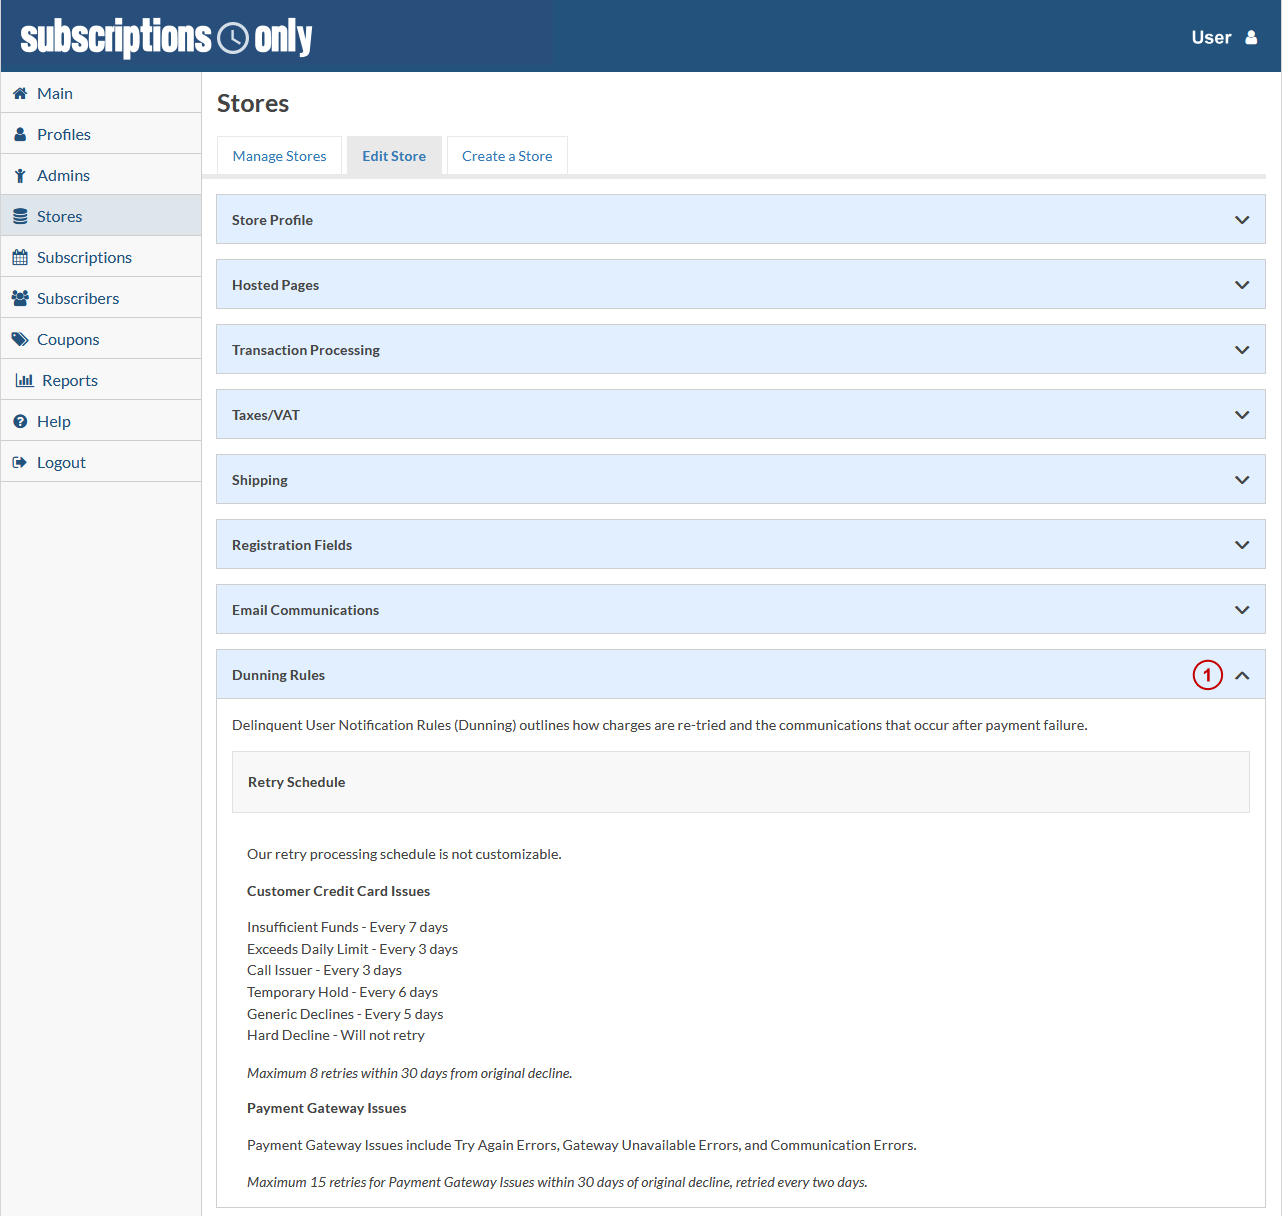
Dunning Rules
Our application uses Delinquent User Notification Rules (Dunning) which outline how charges are re-tried after a charge fails and the communications that occur.
To review our Dunning Rules sign in to the Seller Dashboard and click Stores from the left Menu then choose the store you want to manage and click the icon. You’ll land on the Store Management page, click Dunning Rules (1) and the area will expand.
To view the actual Outbound Subscriber Emails visit the Email Communications Tutorial above.
What are the blue circles with Question Marks ()? We call them On Page Tutorials or OPT’s. They are full of information about the field or fields you are working with.
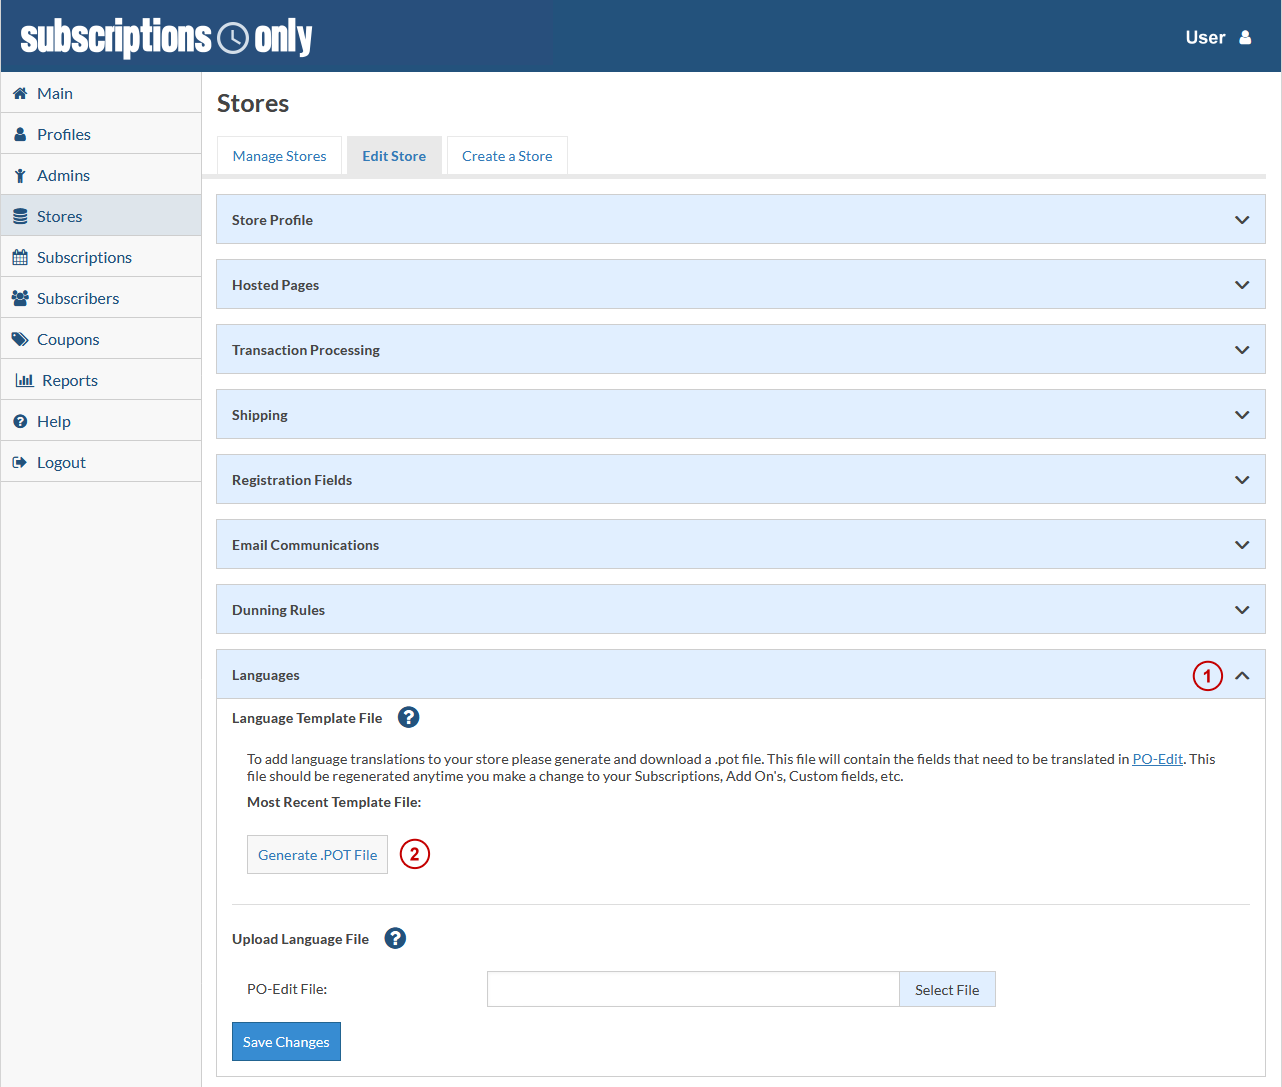
Languages
Subscriptions Only is the only Billing Software Application Platform on the market that allows you to speak to your customers in the language they speak. It’s a truly unique feature that only our platform has.
Languages Part 1 – Creating a New Translation
This feature is designated to Enterprise and White Label Service Plans.
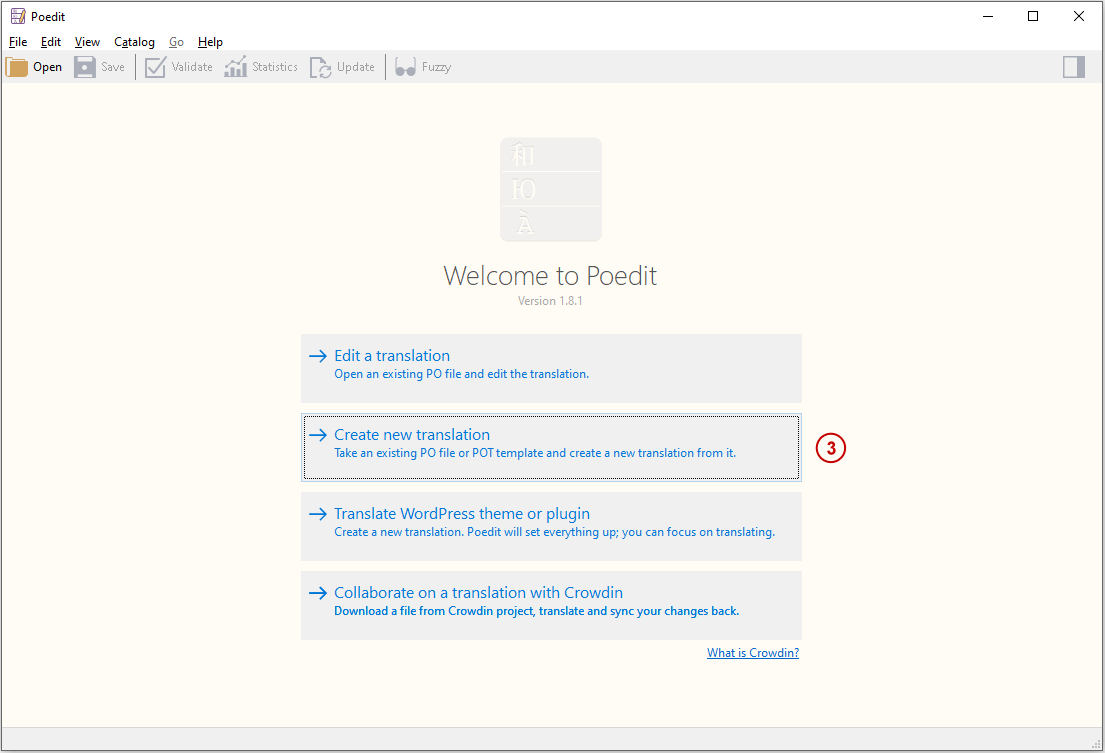
To start adding Languages to your store you’ll need Poedit Translation Software. Below we’ll explain in detail how this software works with our translation algorithm. Example screenshots from Poedit are not guaranteed to be up to date as we do not control the Poedit platform.
To manage the Languages sign in to the Seller Dashboard and click Stores from the left Menu then choose the store you want to manage and click the icon. You’ll land on the Store Management page, click Languages (1) and the area will expand. Follow these steps to create a new translation.
Step 1: Under Language Template File click Generate .POT file (2) then the page will refresh. Then click Download. We suggest saving the file to a location on your device that is easily accessible. The file you download will contain all field labels for the Hosted Store Pages and Subscriber Dashboard. Email Translations are available with our White Label Service Plan.
Step 2: Open Poedit and click Create New Translation (3) and choose the .POT file you downloaded and click Open.
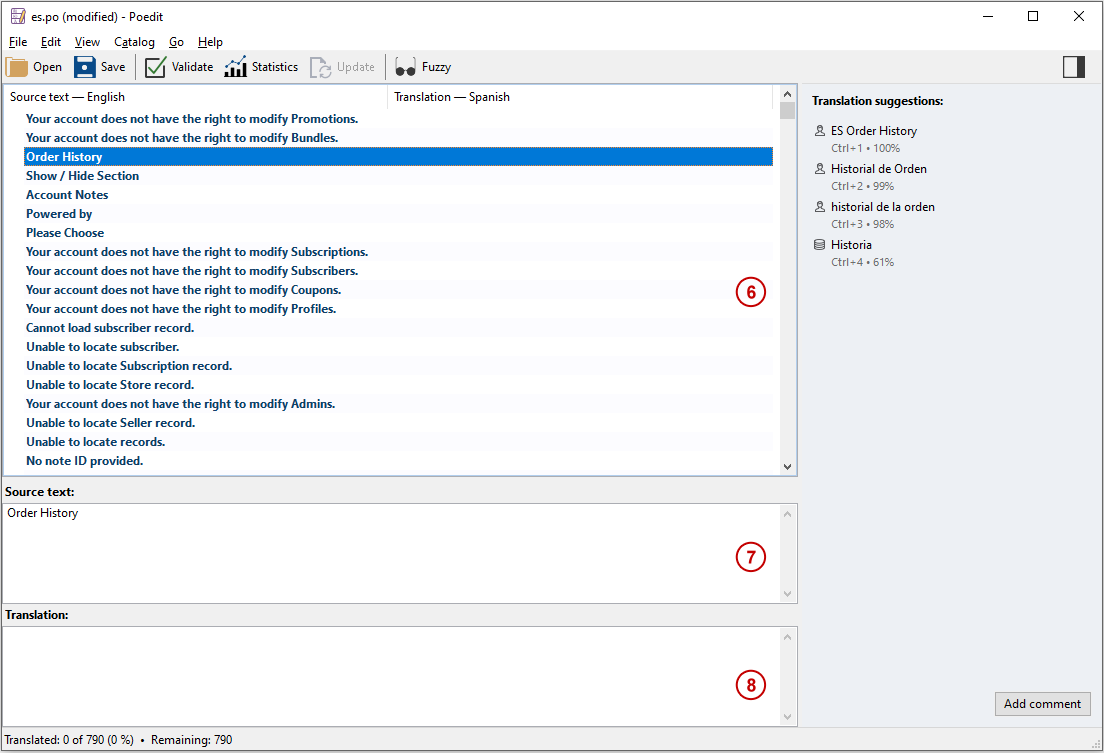
Poedit will then ask you to choose the language (choices from a drop down) you want to translate your file to (4). Once selected click OK (5).
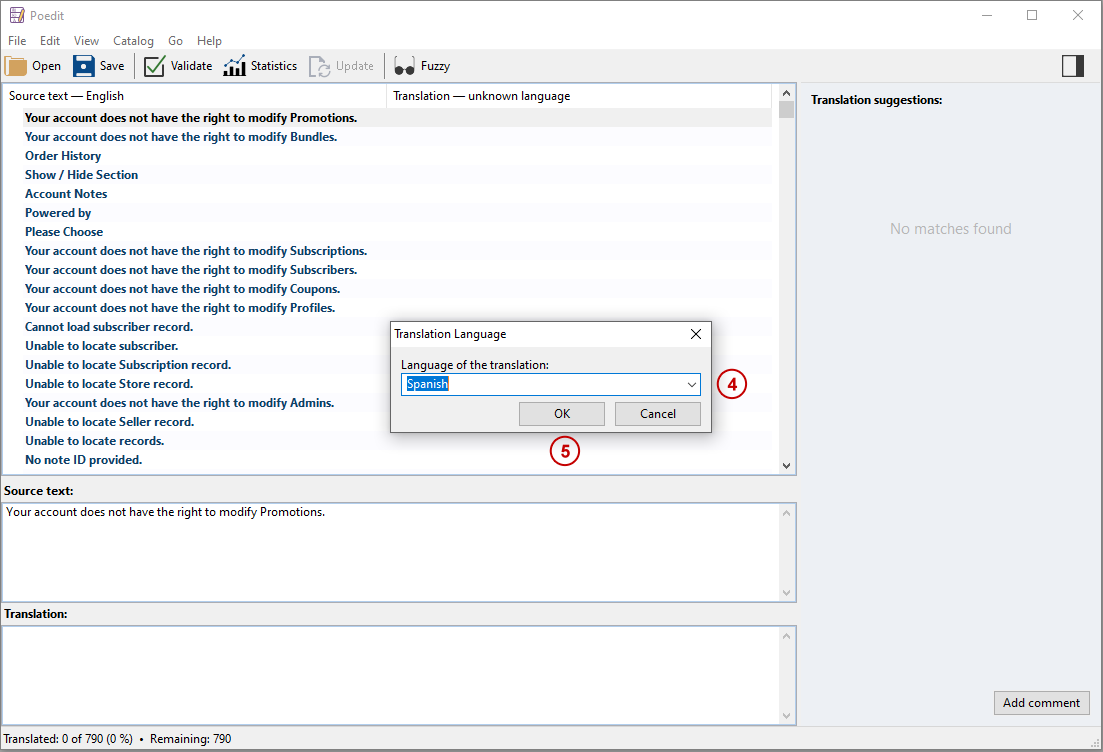
Now that the .POT file is loaded and a language has been chosen its time to get translating.
To translate click on the desired bold Source Text in the top box (6). The middle box will repeat the Source Text (7). The bottom box is where Translations are input (8) for the desired source text. After translation is complete the source text will be un-bolded.
Remember any/all BOLD text will need to be translated.
Once you have finished translating all source text you need to save your file as a PO Translation File (.po). To do this go to the top of Poedit and click on File > Save As > and save your file.
SPECIAL NOTE If any of your text uses “quotes” those will need to be translated accordingly. Example... If you are trying to translate The "Boat Show" is streaming in the background as I work, the source text would be:
The **"Boat Show"** is streaming in the background as I work.
Your translation (in Spanish) will be:
El **"Salón Náutico"** se transmite en segundo plano mientras trabajo
The
""
is what makes the quote marks appear in the text you are translating.
Translation is complete and ready to upload, just follow these steps to upload your translated .PO file.
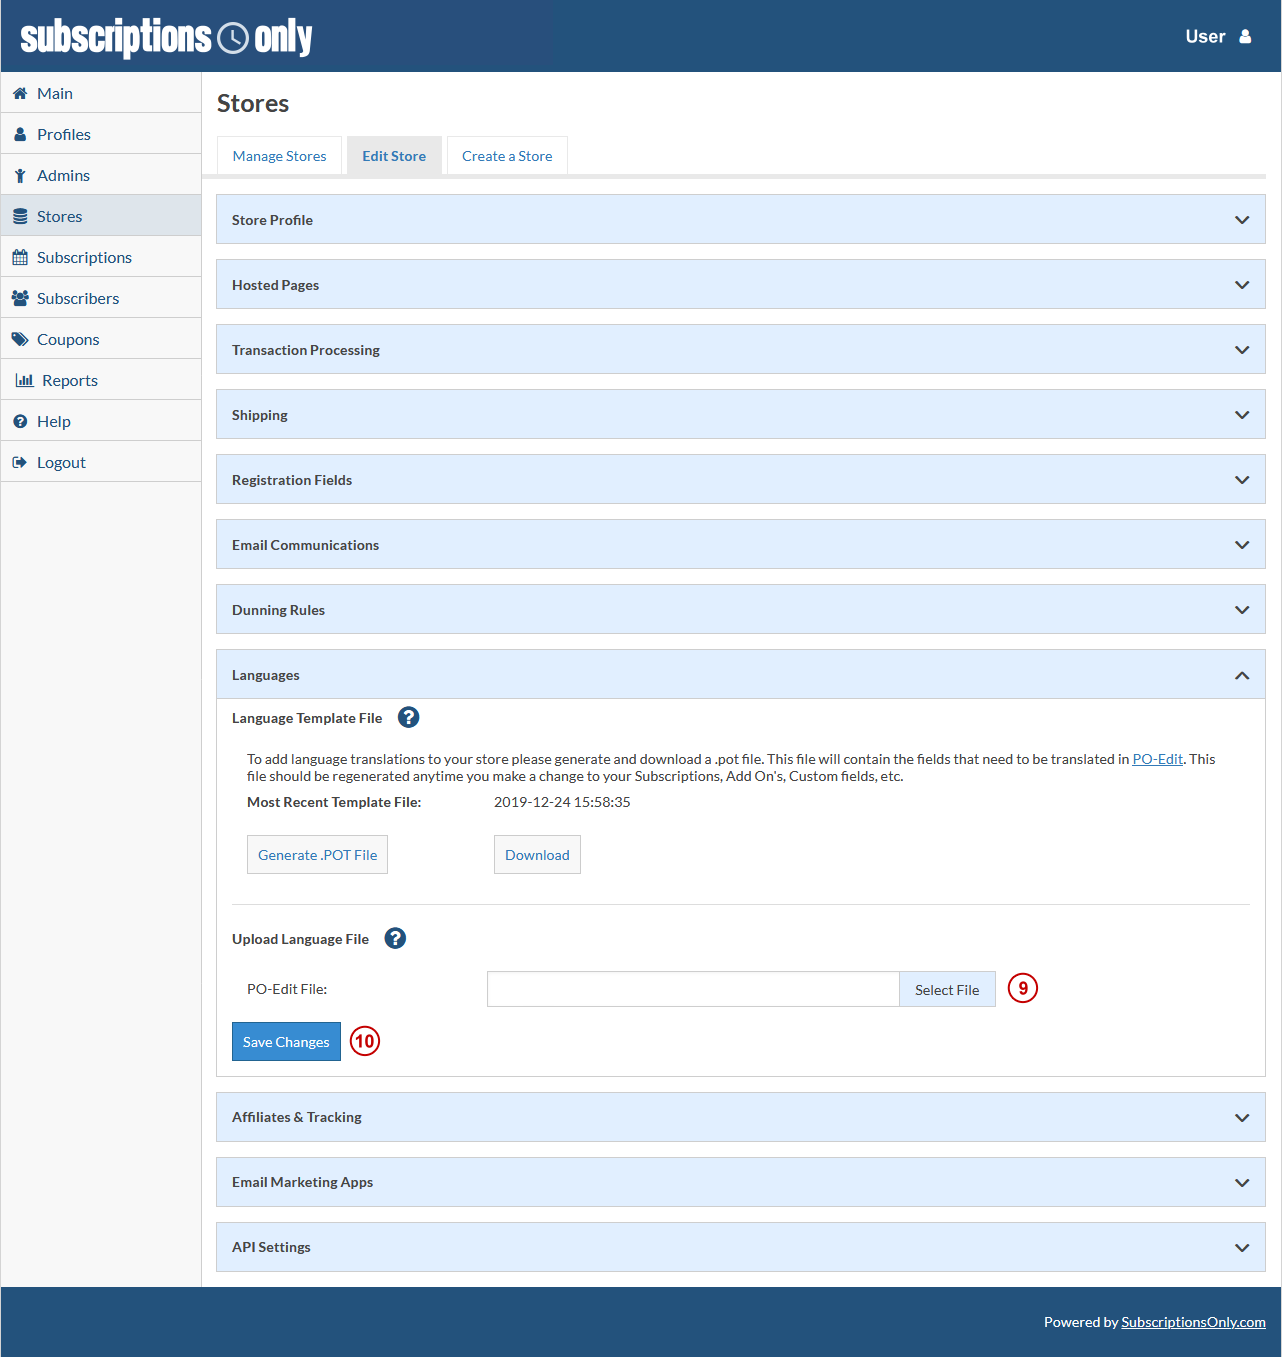
Step 1: You’ll need to be on the Store Management page, in the Languages area.
Step 2: Within the Upload Language File area click Select File (9) and choose the .PO file you saved from your translation. Once your file is uploaded click Save Changes (10).
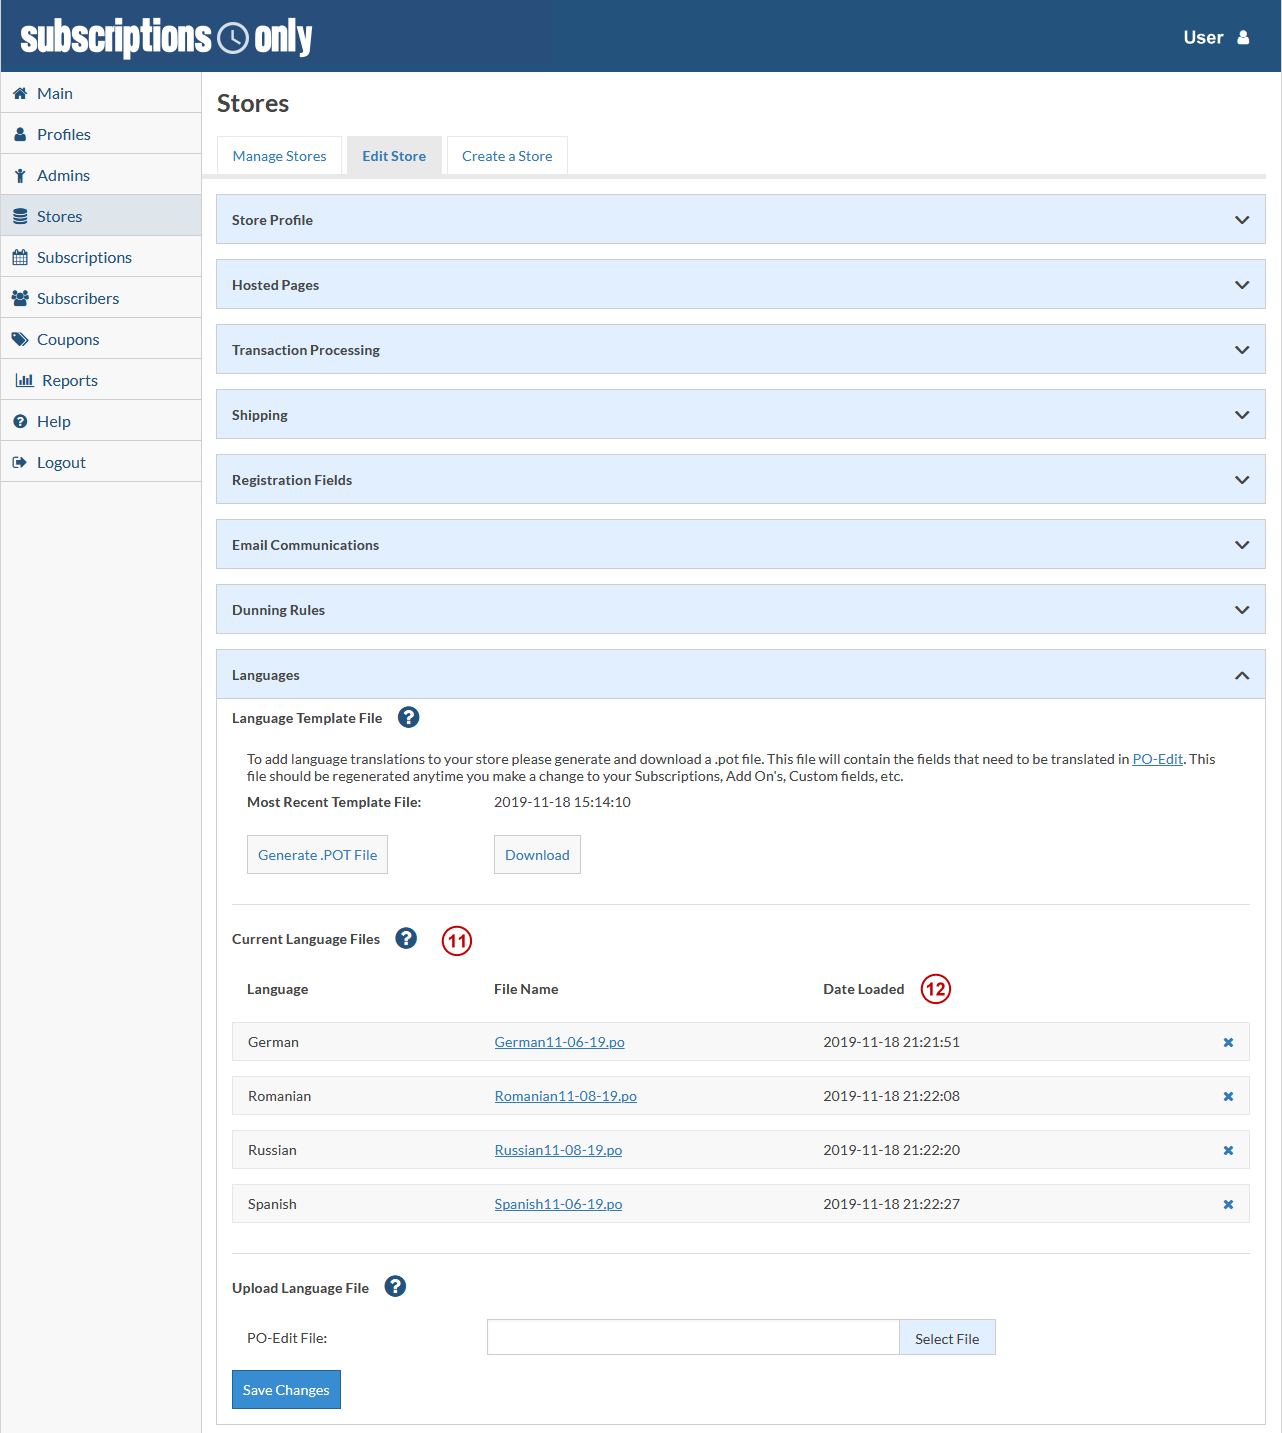
After loading your language file(s) the dashboard will show you the languages you have installed (11) including the date the language was loaded (12).
Languages Part 2 – Updating a Translation
Anytime a change is made to your product descriptions (Subscriptions & Add-Ons) you’ll need to update your language file(s). Field label text is rarely changed but if we do an update you’ll be notified so that the appropriate translations can be made.
To manage the Languages sign in to the Seller Dashboard and click Stores from the left Menu then choose the store you want to manage and click the "pencil” icon. You’ll land on the Store Management page, click Languages and the area will expand. Under Language Template File click on "Generate .POT File" and then click on "Download". This will be the UPDATED .POT file and it will show the last download date. You’ll be given the option to save the template or open it in Poedit. Save your template. Once you are in Poedit, open your original .po language file (not the new file you just downloaded) and load it into Poedit. After the .po file is loaded in Poedit click on Catalog (13) and Update from POT file (14).

Any additional text that has been added or updated within your store site will be in Bold in the Source Text box. Repeat the steps for translating as outlined above. Once you have finished all of your translations click on File then Save As and name your translation and save it as a .po file.
Go back to the Dashboard and go back to the language section by following the steps above. Under Upload Language File click on "Select File" and choose the file you saved from your translation. Make sure to select the .po file. Once your file is uploaded click Save Changes.
Affiliates & Tracking
If you employ Affiliate Tracking Software such as Post Affiliate Pro, iDevAffiliate or ShareASale we offer custom integration for White Label Service Plans. Contact us for more information.
Email Marketing Apps
If you market via email, Subscriptions Only connects to AWeber, Constant Contact, and MailChimp.
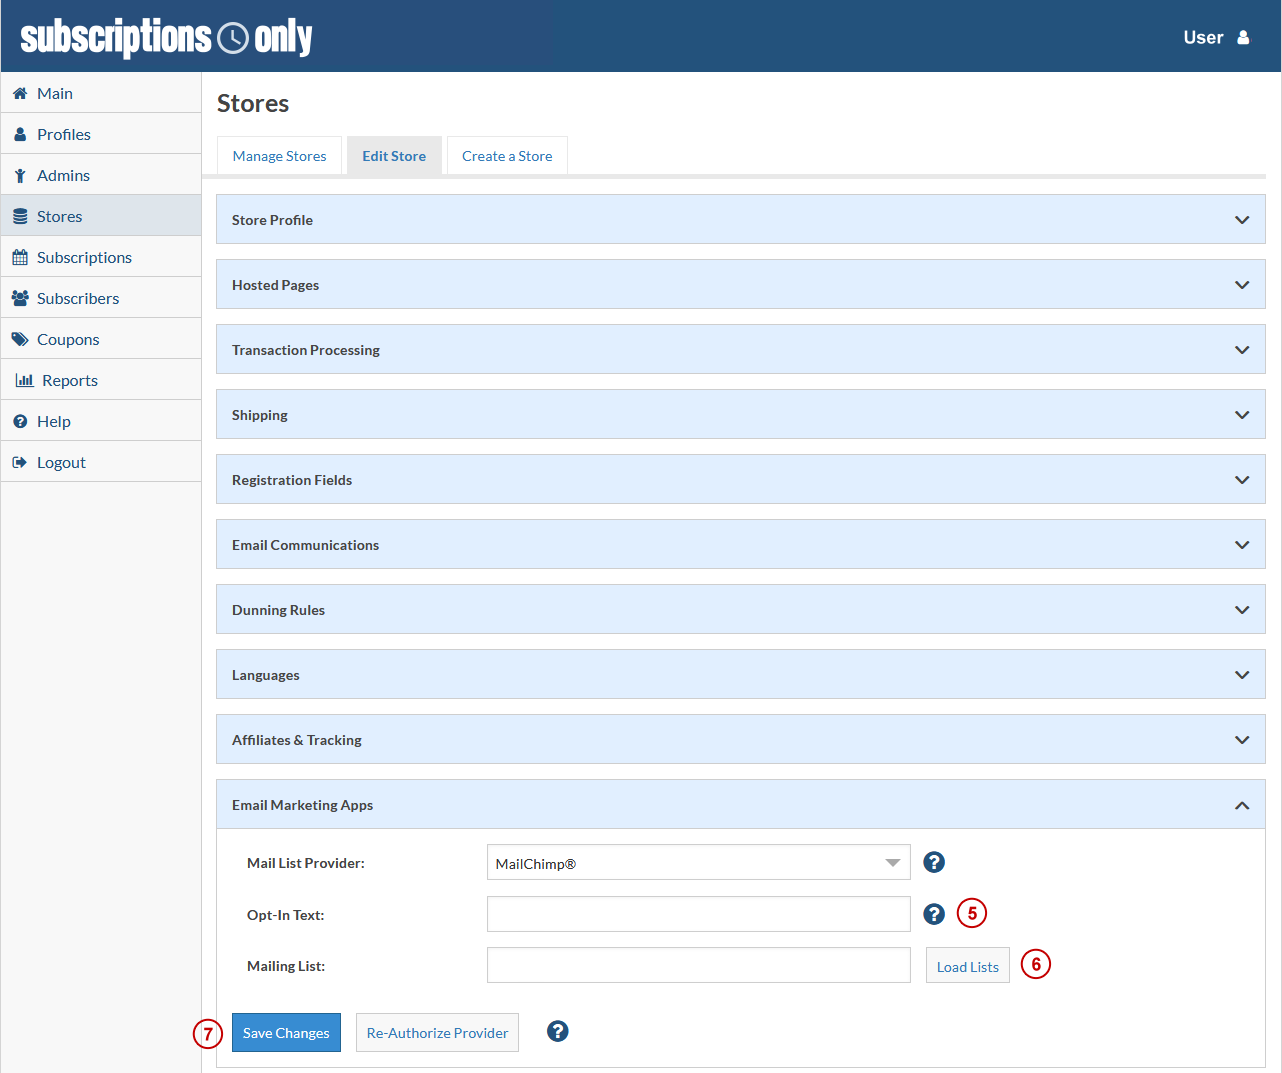
To manage your stores Email Marketing Apps sign in to the Seller Dashboard and click Stores from the left Menu then choose the store you want to manage and click the icon.
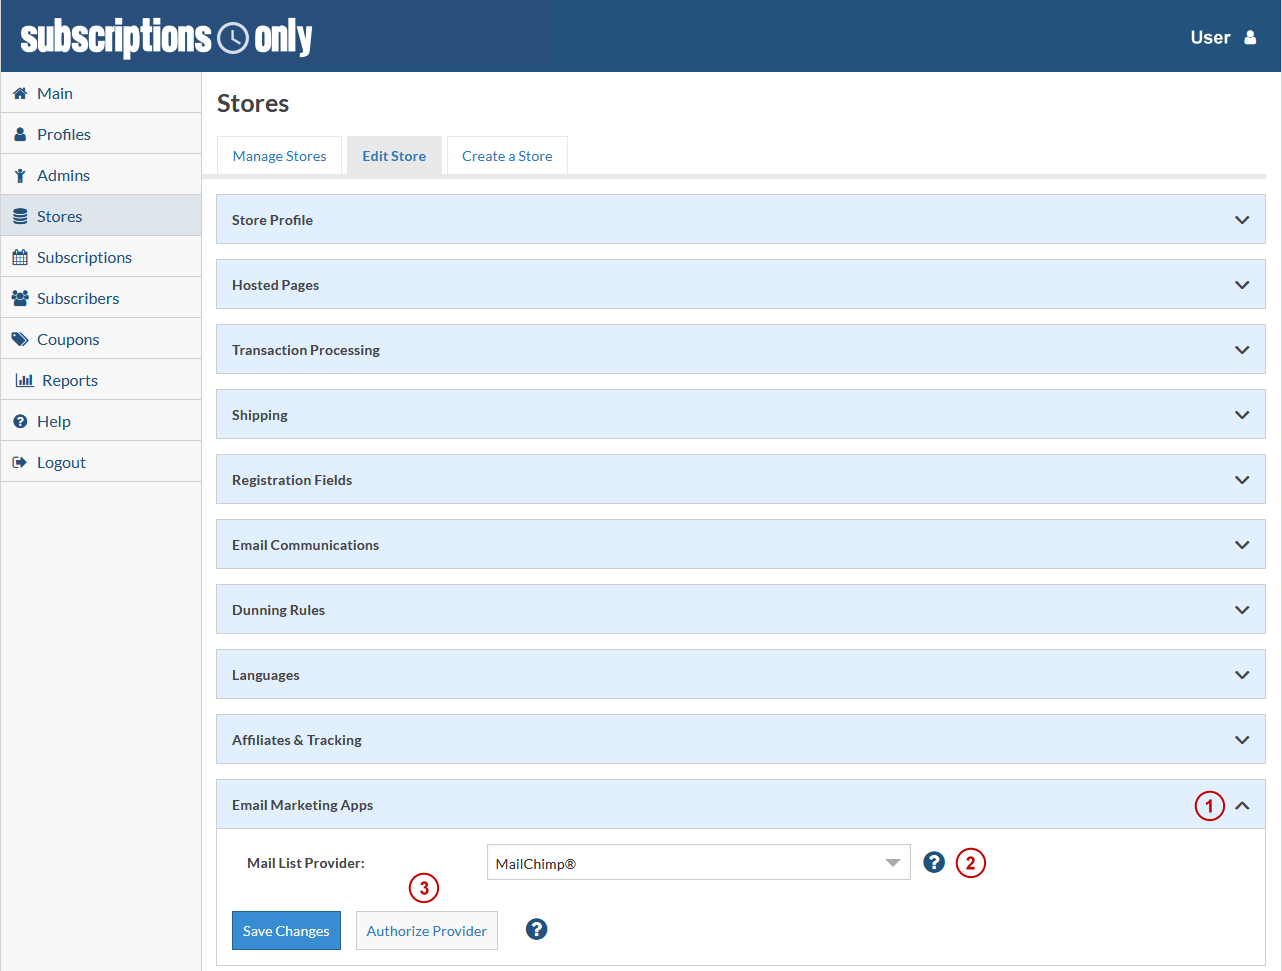
You’ll land on the Store Management page, click Email Marketing Apps (1) and the area will expand.
Once you are in this section click the drop down and choose which Mail List Provider (2) you use (MailChimp is being used for our example).
To use Mail Chimp, choose it in the drop down and click Authorize Provider (3).
After clicking Authorize Provider, Mail Chimp will open in a new screen where you will need to enter your login credentials (4). Click log in and you will be redirected back to the dashboard. An API Key will be auto populated in our system. Next fill in the Opt-In Text area (5) (this is what subscribers will see when they agree to sign up for your emails). Example: By entering my email address I agree to receive marketing emails. Next click Load List (6) and choose which mailing list you want to utilize. Click Save Changes (7).

If you have a provider that is not listed we offer a completely customizable White Label Service Plan.
Here’s an overview of our other connected apps.
AWeber: To use AWeber choose it in the drop down. Click Authorize Provider. AWeber will open where you will need to enter your login credentials. Once logged in Click Allow Access and that will bring you back to your dashboard. An Access Key and Access Secret will be populated. Fill in the Opt-In Text area (this is what subscribers will see when they agree to sign up for your emails). Example: By entering my email address I agree to receive marketing emails. Click on Load List and choose which mailing list you want to utilize. Click Save Changes.
Constant Contact: To use Constant Contact, choose it in the drop down. Click Authorize Provider. Constant Contact will open where you will need to enter your login credentials. Once logged in Click Allow and that will bring you back to your dashboard. A user name and an Access Token will be populated. Fill in the Opt-In Text area (this is what subscribers will see when they agree to sign up for your emails). Example: By entering my email address I agree to receive marketing emails. Click on Load List and choose which mailing list you want to utilize. Click Save Changes.
What are the blue circles with Question Marks ()? We call them On Page Tutorials or OPT’s. They are full of information about the field or fields you are working with.
API Settings
Want semi-custom integration without upgrading to the White Label Service Plan? We offer an API that provides enough access to build your own custom storefront and dashboard, it’s pretty cool! If you choose to integrate with our platform rest assured it’s straight forward but know you will need a programmer that is competent with API’s (Application Programming Interfaces).
If you plan to use our API and do not have a competent programmer, we’re available for hire.
To access this feature sign in to the Seller Dashboard and click Stores (1) from the left Menu then choose the store you want to manage and click the "pencil” icon.
You’ll land on the Store Management page, click API Settings (2) and the area will expand.
From the drop down menu choose Enable (3) and click Save Changes (4).
After enabling you’ll want to start here and visit our API Specifications.
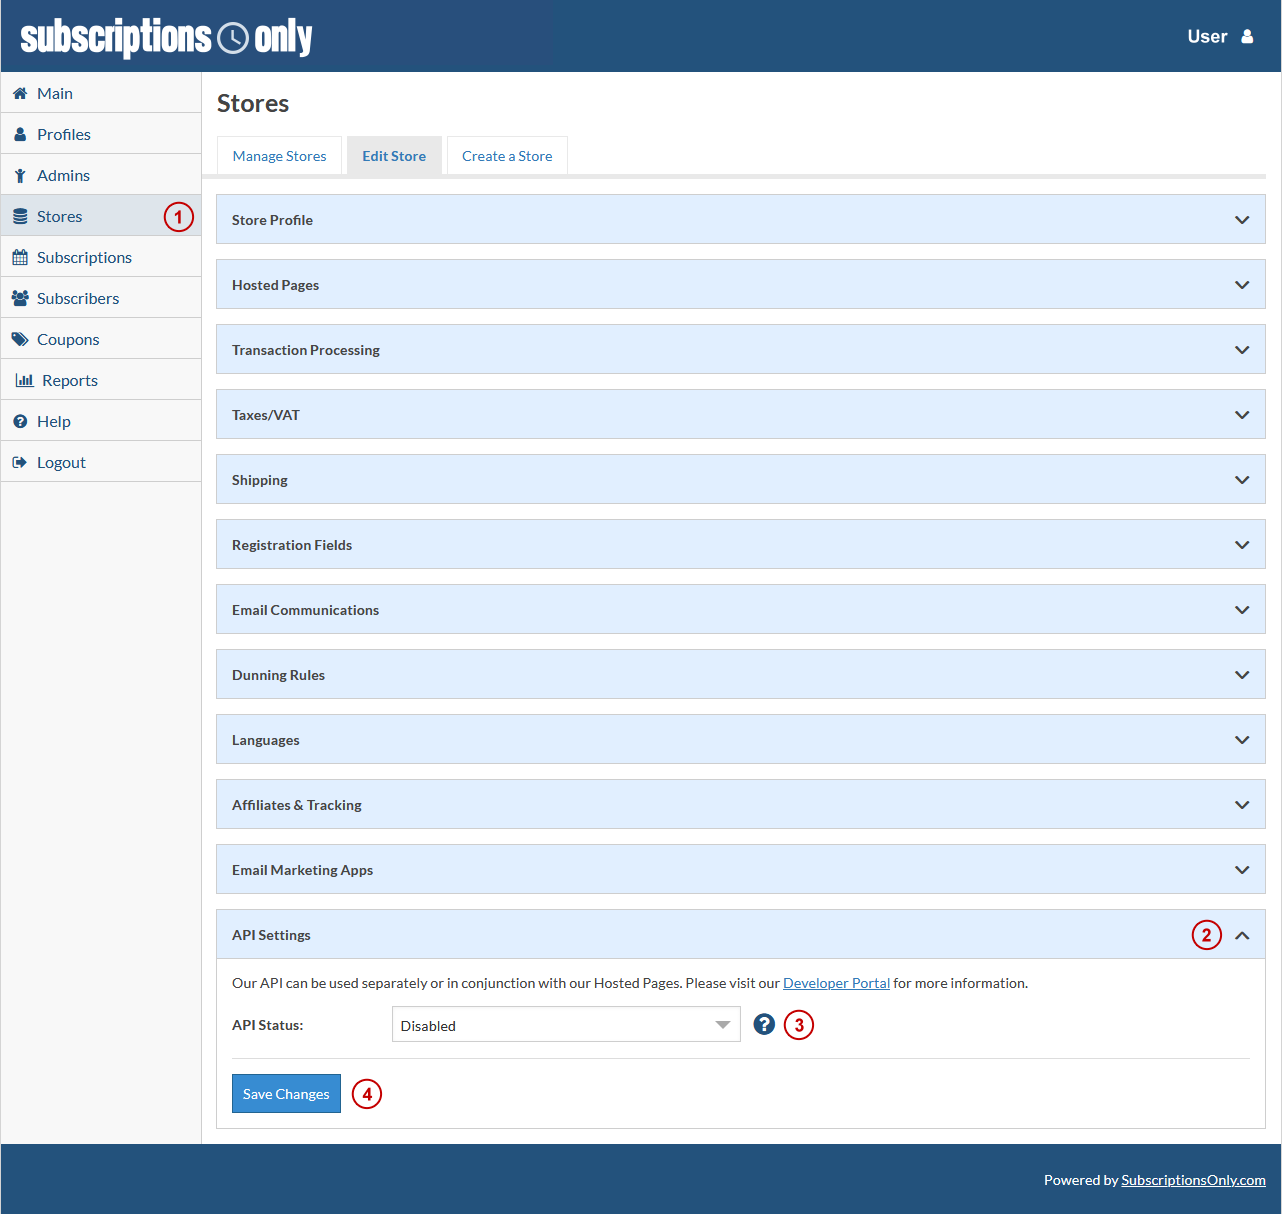
This feature is designated to Enterprise and White Label Service Plans.
What are the blue circles with Question Marks ()? We call them On Page Tutorials or OPT’s. They are full of information about the field or fields you are working with.