Managing Subscribers
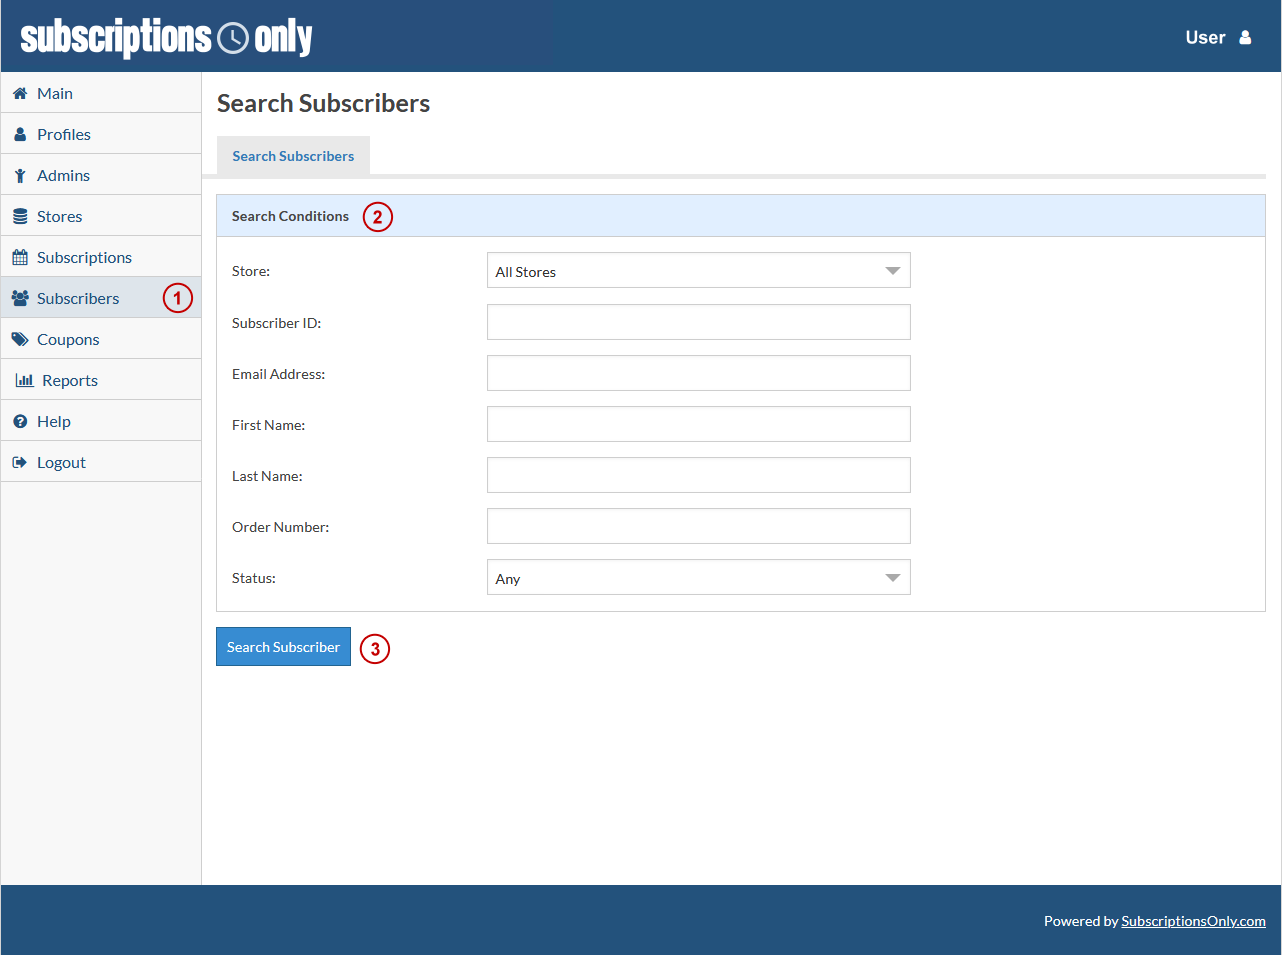
To manage subscribers sign in to the Seller Dashboard and click Subscribers (1). Under Search Conditions (2), choose which search parameters are applicable to your search. Once entering search parameters, click Search Subscriber (3).
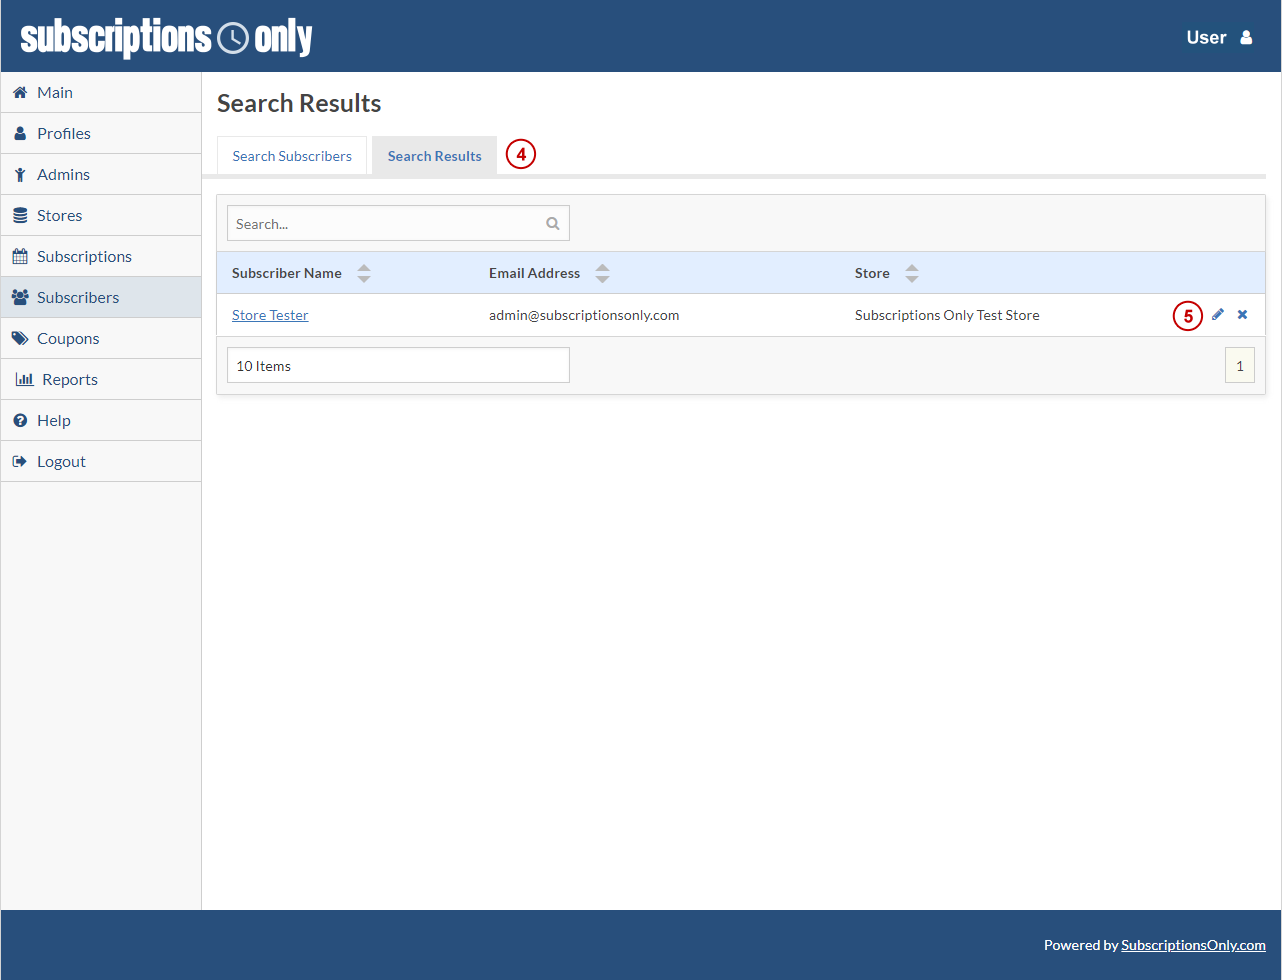
Upon submission you will be taken to the Search Results (4). Here you will see a list of all your subscribers that fell within the parameters of your search. In addition to basic subscriber information you’ll find edit () and delete () icons (5).
Editing a Subscriber
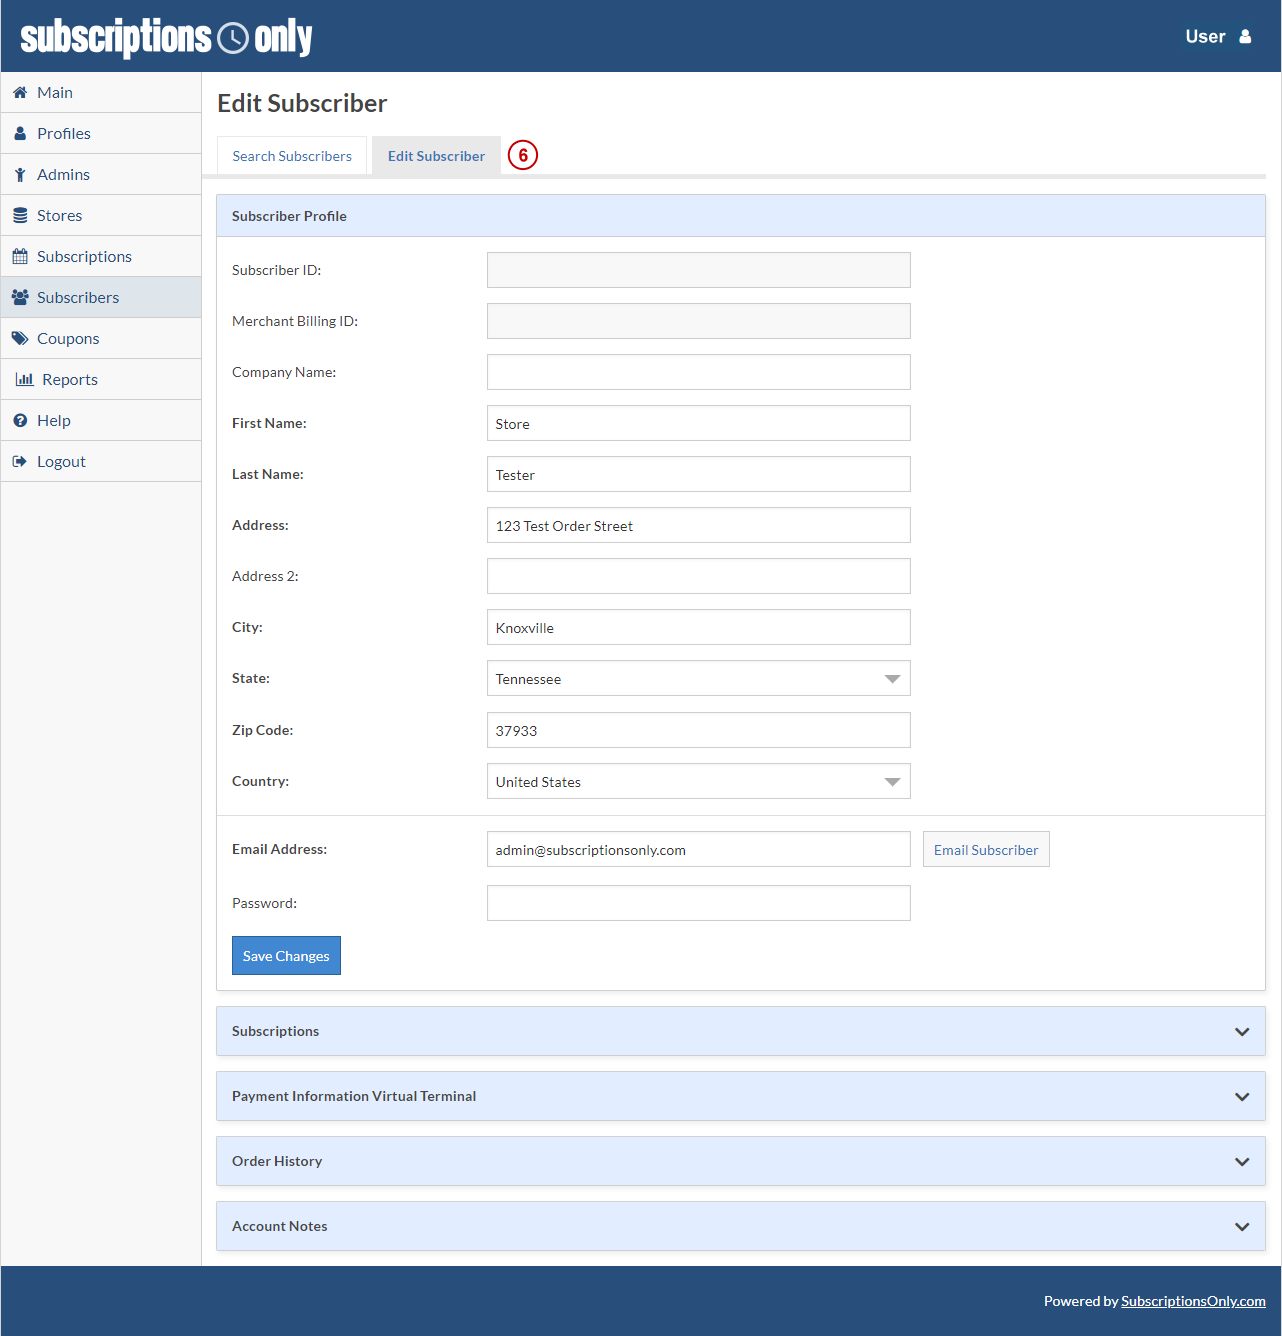
After clicking the icon you’ll be on the Edit Subscriber page (6). The Edit Subscriber page has different areas that can be viewed, but only the Subscriber Profile can be edited. Each area is described in detail in the following tutorials:
Payment Information Virtual Terminal
To see any of these tutorials, simply click the links.
Deleting a Subscriber
To delete a subscriber just click the icon. You’ll get a confirmation screen confirming the deletion. Just confirm and you're done.
Remember when deleting a subscriber the data will be deleted but will still appear in reports.
Subscriber Profile
When making updates to the Subscriber Profile the grayed out fields are non-editable. All of the other fields are editable.
In addition to field editing you'll also have the ability to email the subscriber directly from your email client by clicking the Email Subscriber button (1).
After your updates are completed, click Save Changes (2).
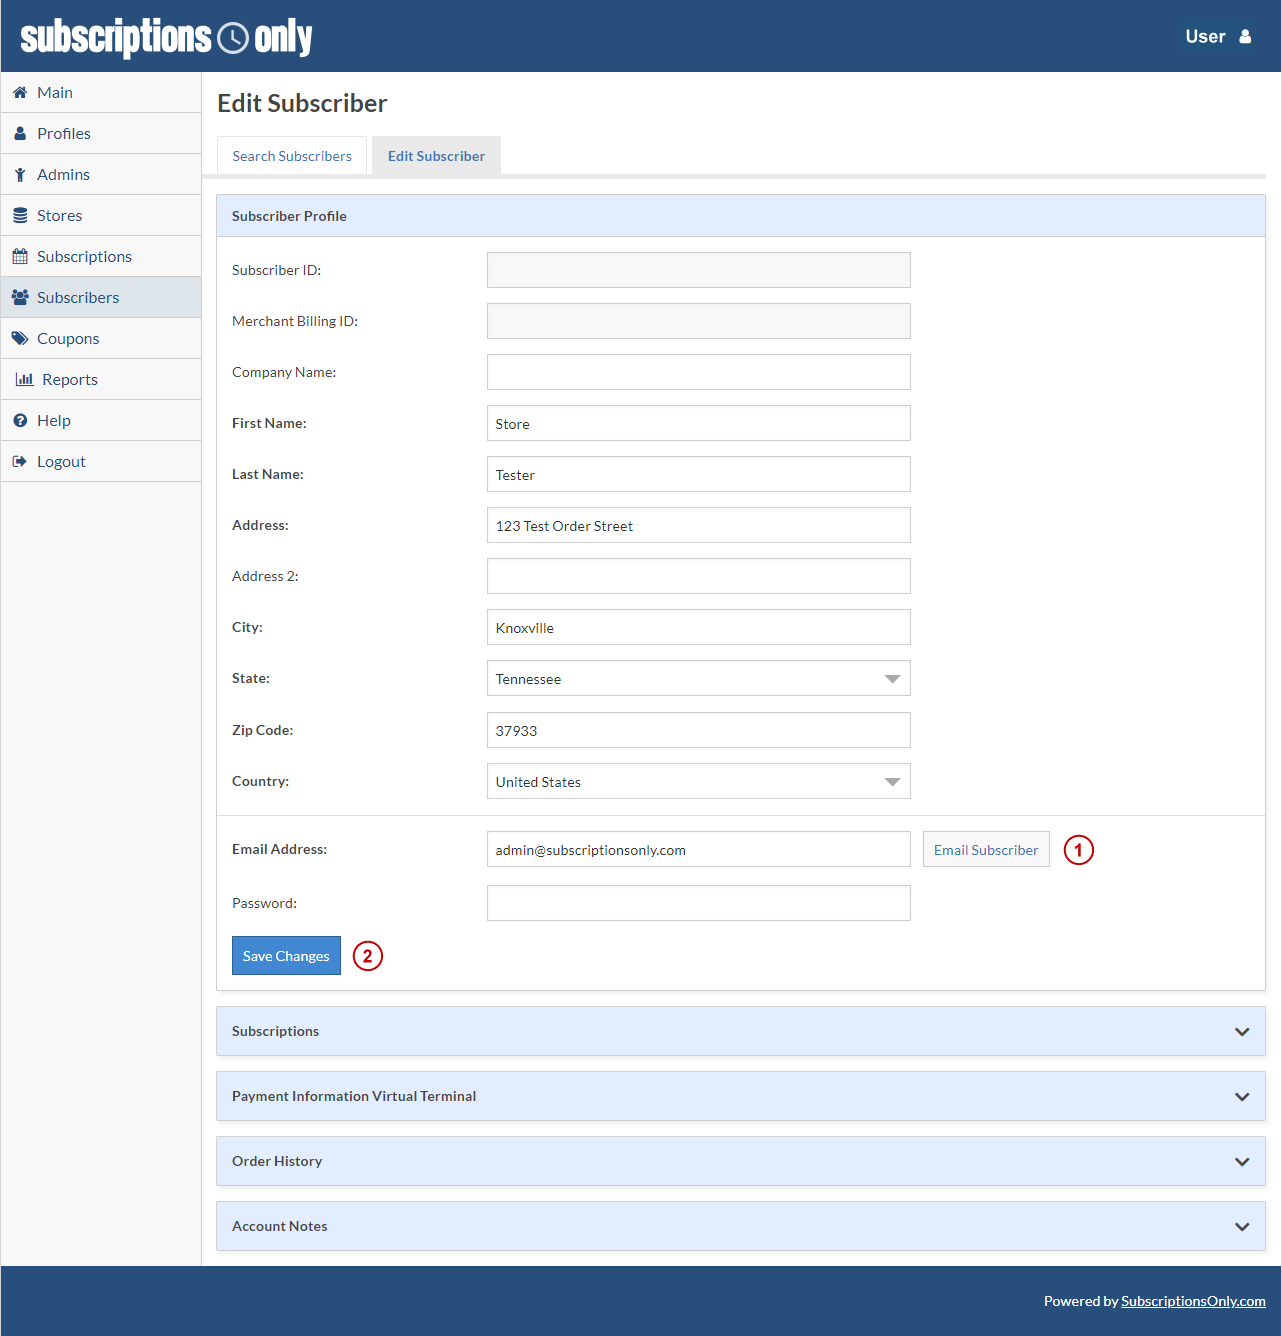
Remember any field labels that are BOLD are required.
What are the blue circles with Question Marks ()? We call them On Page Tutorials or OPT’s. They are full of information about the field or fields you are working with.
Subscriptions
This tutorial discusses how to manage an existing Subscription within a specific subscriber account.
You’ll need to get to the Edit Subscriber page first.
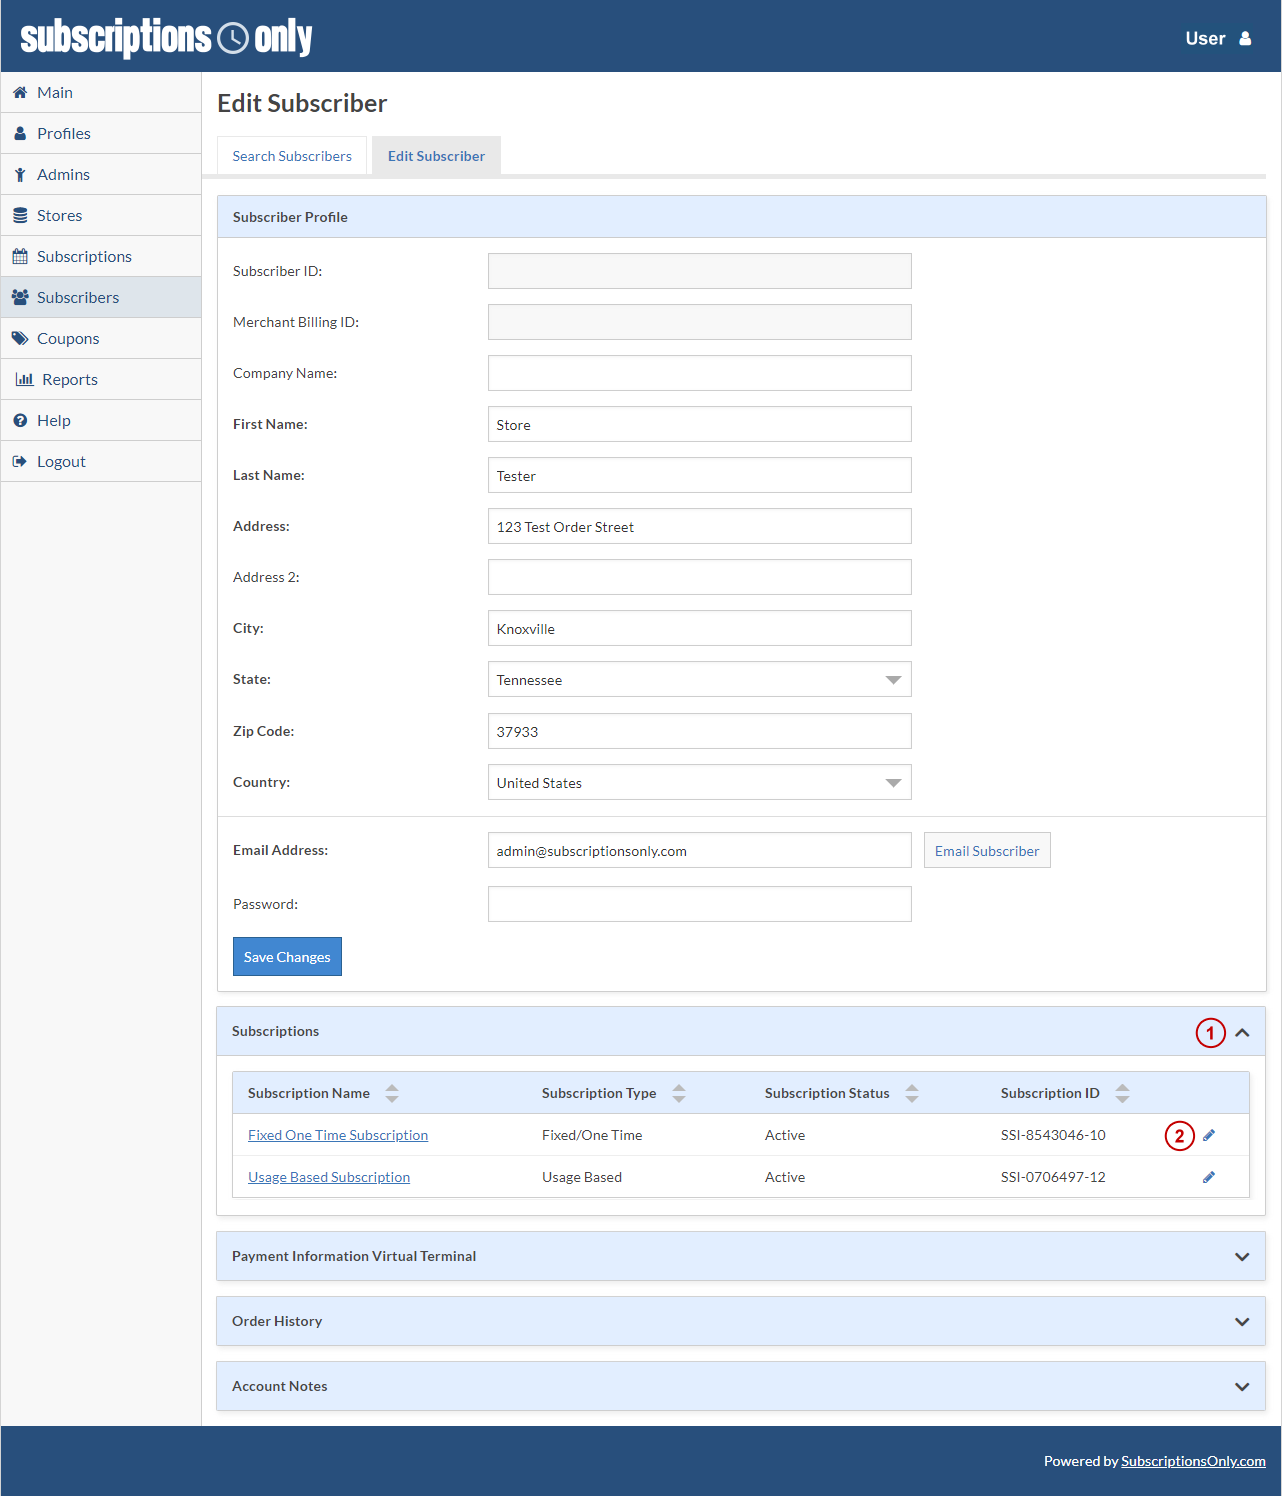
Once inside the Subscriber's Profile choose Subscriptions (1).
Once the area drops down you’ll see all Subscriptions associated with the subscriber record you are viewing. Click the edit () icon (2) and you’ll be transported to that Subscription information.
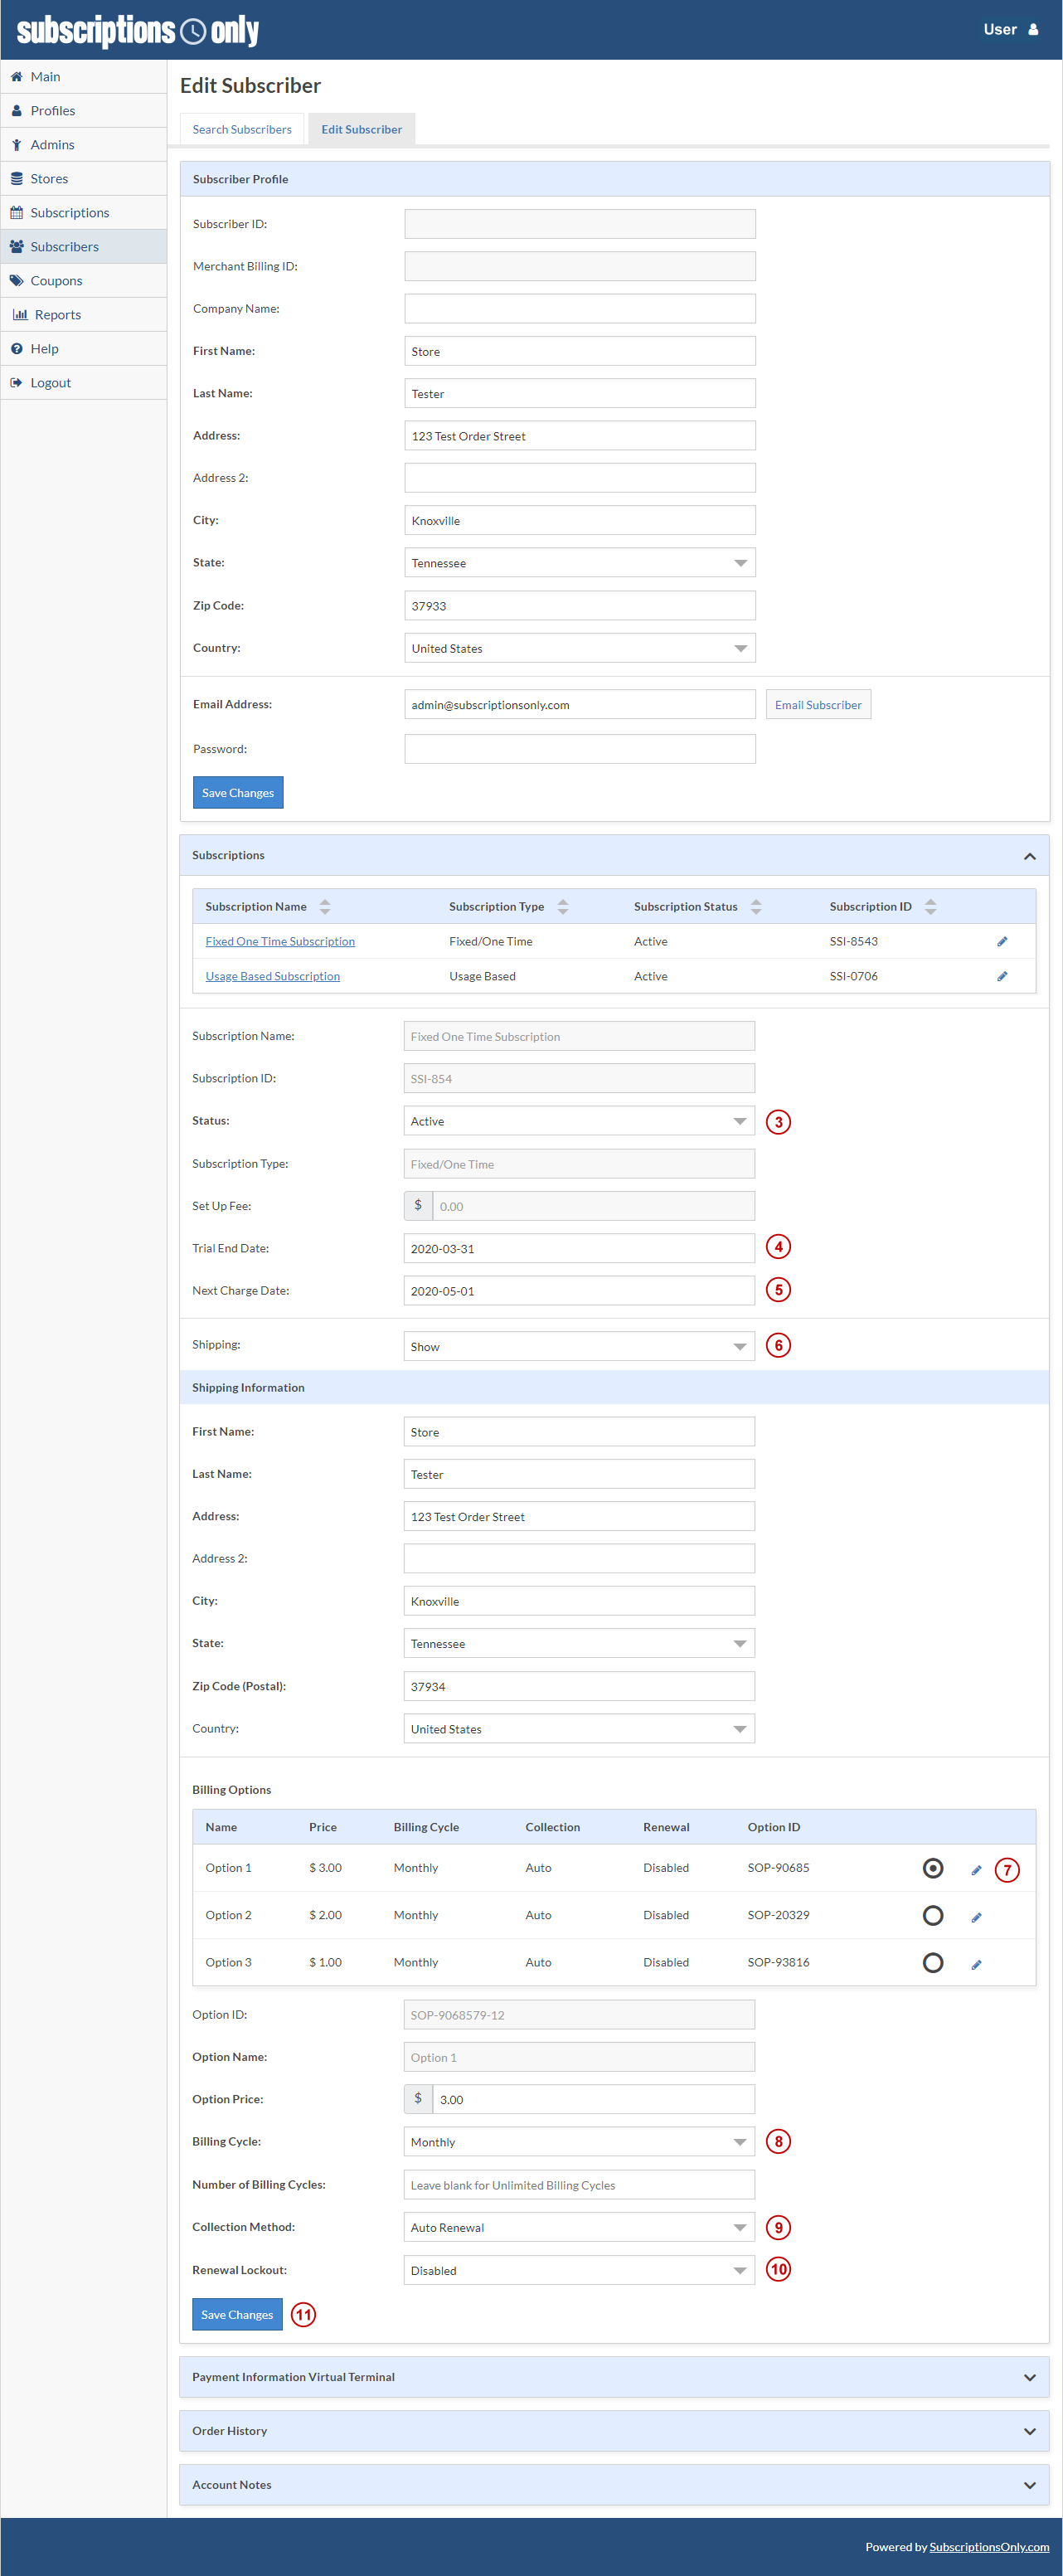
Once viewing the Subscription information you’ll be able to edit any information that is not grayed out.
For this tutorial we have chosen the “Fixed” Subscription.
Once viewing the record you’ll see grayed out areas (as mentioned above). Those areas are non-editable but you can adjust the Status (3), The Trial End Date (4), and The Next Charge Date (5).
Other important areas include:
Shipping: This area when shown, shows the subscribers shipping information which is editable(6).
Billing Options: By clicking on the edit () icon this area allows you to change the Price (7), the Billing Cycle (8), the Collection Method (9), and the Renewal lockout (10).
For more information about any of the subscription settings visit the tutorial on Creating and Managing Subscriptions here.
After adjustments have been made, click Save Changes (11).
Remember any field labels that are BOLD are required.
What are the blue circles with Question Marks ()? We call them On Page Tutorials or OPT’s. They are full of information about the field or fields you are working with.
Payment Information Virtual Terminal
This tutorial discusses how to do an open charge, provide a refund for a transaction and how to manually update a subscribers card.
You’ll need to get to the Edit Subscriber page first.
Once inside the Subscriber's Profile choose Payment Information Virtual Terminal (1).
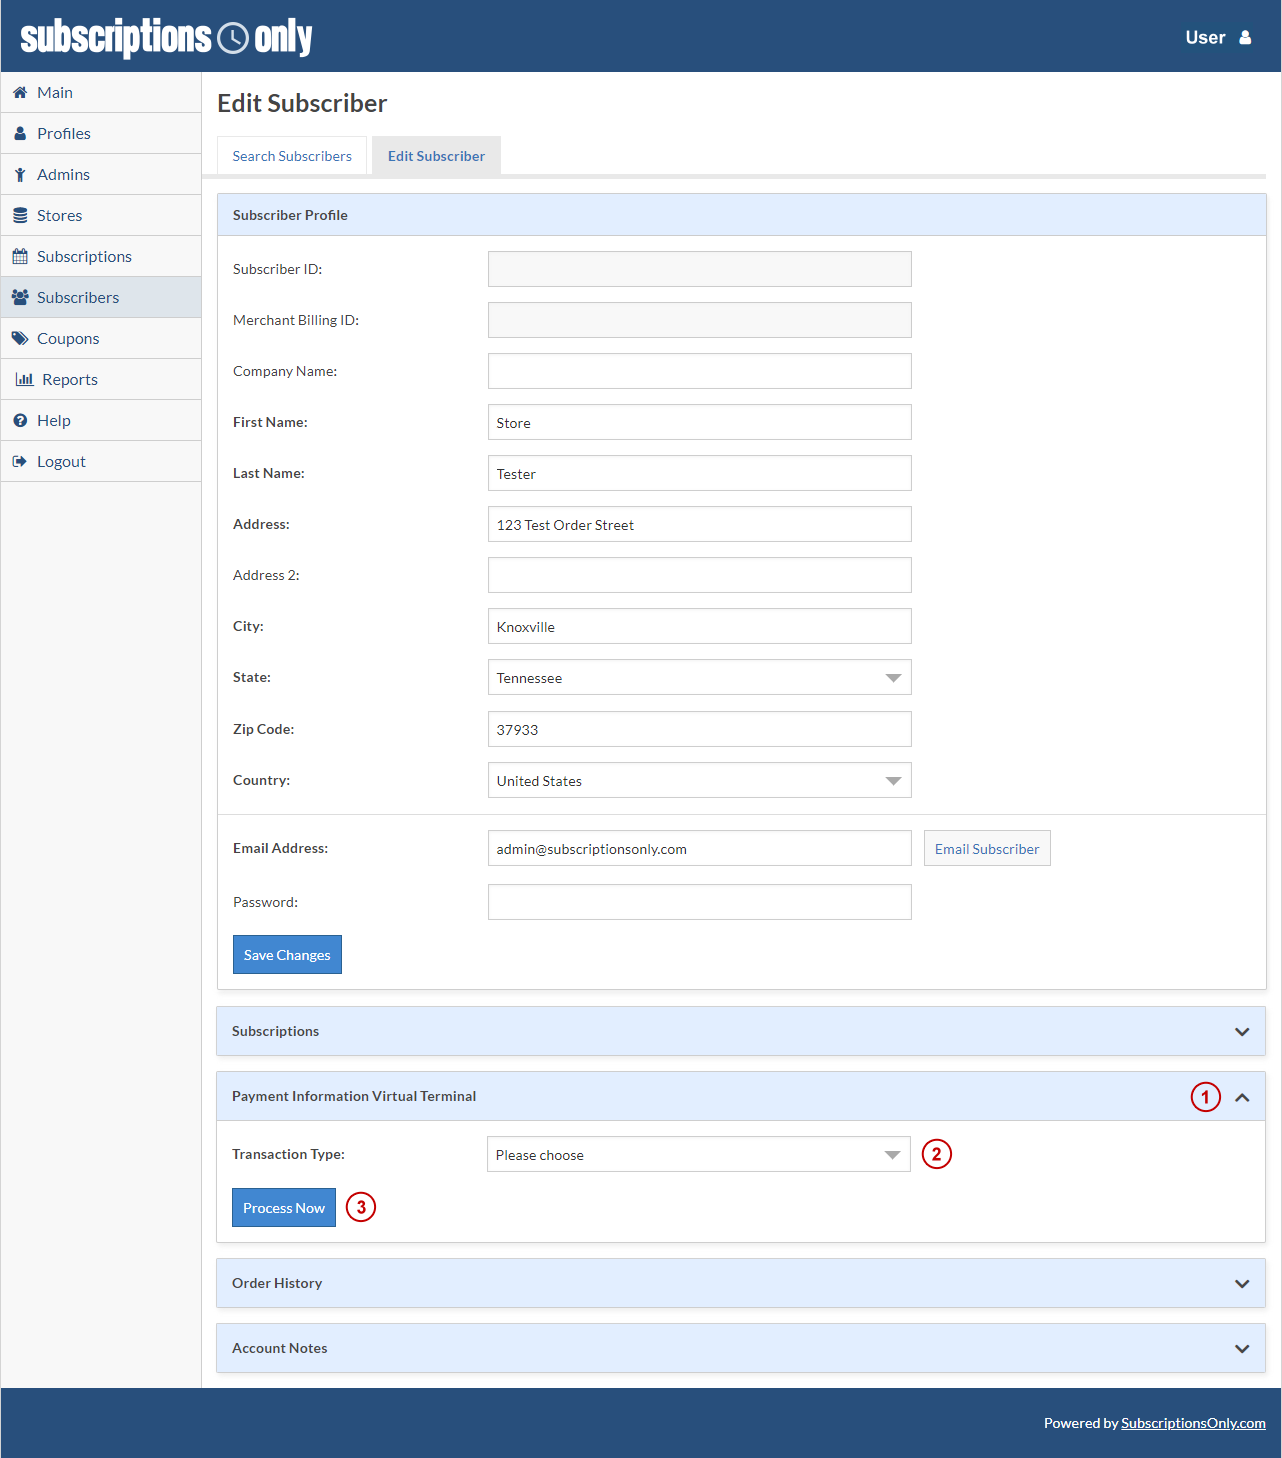
From the drop down box (2) you’ll be able to choose the following transaction types:
Open Charge: This allows you to charge the current subscriber card for miscellaneous. Just choose a payment card to charge and the amount, the system will then communicate with your payment processor and charge the card. You can also provide a description of the transaction.
Refund (Up to 120 Days): If there is a transaction that you want to refund WITHOUT canceling the Subscription this is the place to do it. The system will show which transactions are eligible and you can do a partial or full refund.
Update Card Info: If the current subscriber wants to update their card and calls you this is the place to update it. Remember also they can update their card in the Subscriber Dashboard.
Once completed, click Process Now (3).
Note there are no email communications sent but the transactions do get posted in the Order History area (discussed below) where you can view and create a PDF Invoice to send to your subscriber.
Remember any field labels that are BOLD are required.
What are the blue circles with Question Marks ()? We call them On Page Tutorials or OPT’s. They are full of information about the field or fields you are working with.
Order History
Seeing your Subscriber Order History is essential to communication with your subscribers. This tutorial discusses how to access order history, cancel and refund a Subscription, and view PDF Invoices.
You’ll need to get to the Edit Subscriber page first.
Once inside the Subscriber's Profile choose Order History (1).
The Order History area includes a line item list of all of the subscribers purchases. It includes Date, Order Number, Total Charge, Type, Description. You can even search (2) for a particular transaction and as you type the transactions will appear that match the search criteria.
For functionality in this area we’ve included the following icons:
View: This icon () is the eye icon (3). This allows you to view and create a PDF of the invoice which is discussed below.
Cancel and Refund: This icon () is the undo icon (4). This icon will ONLY appear up to 30 days after the transaction. This action will refund the order in full and cancel any items associated with the order. Your transaction fee's will also be credited to your account.
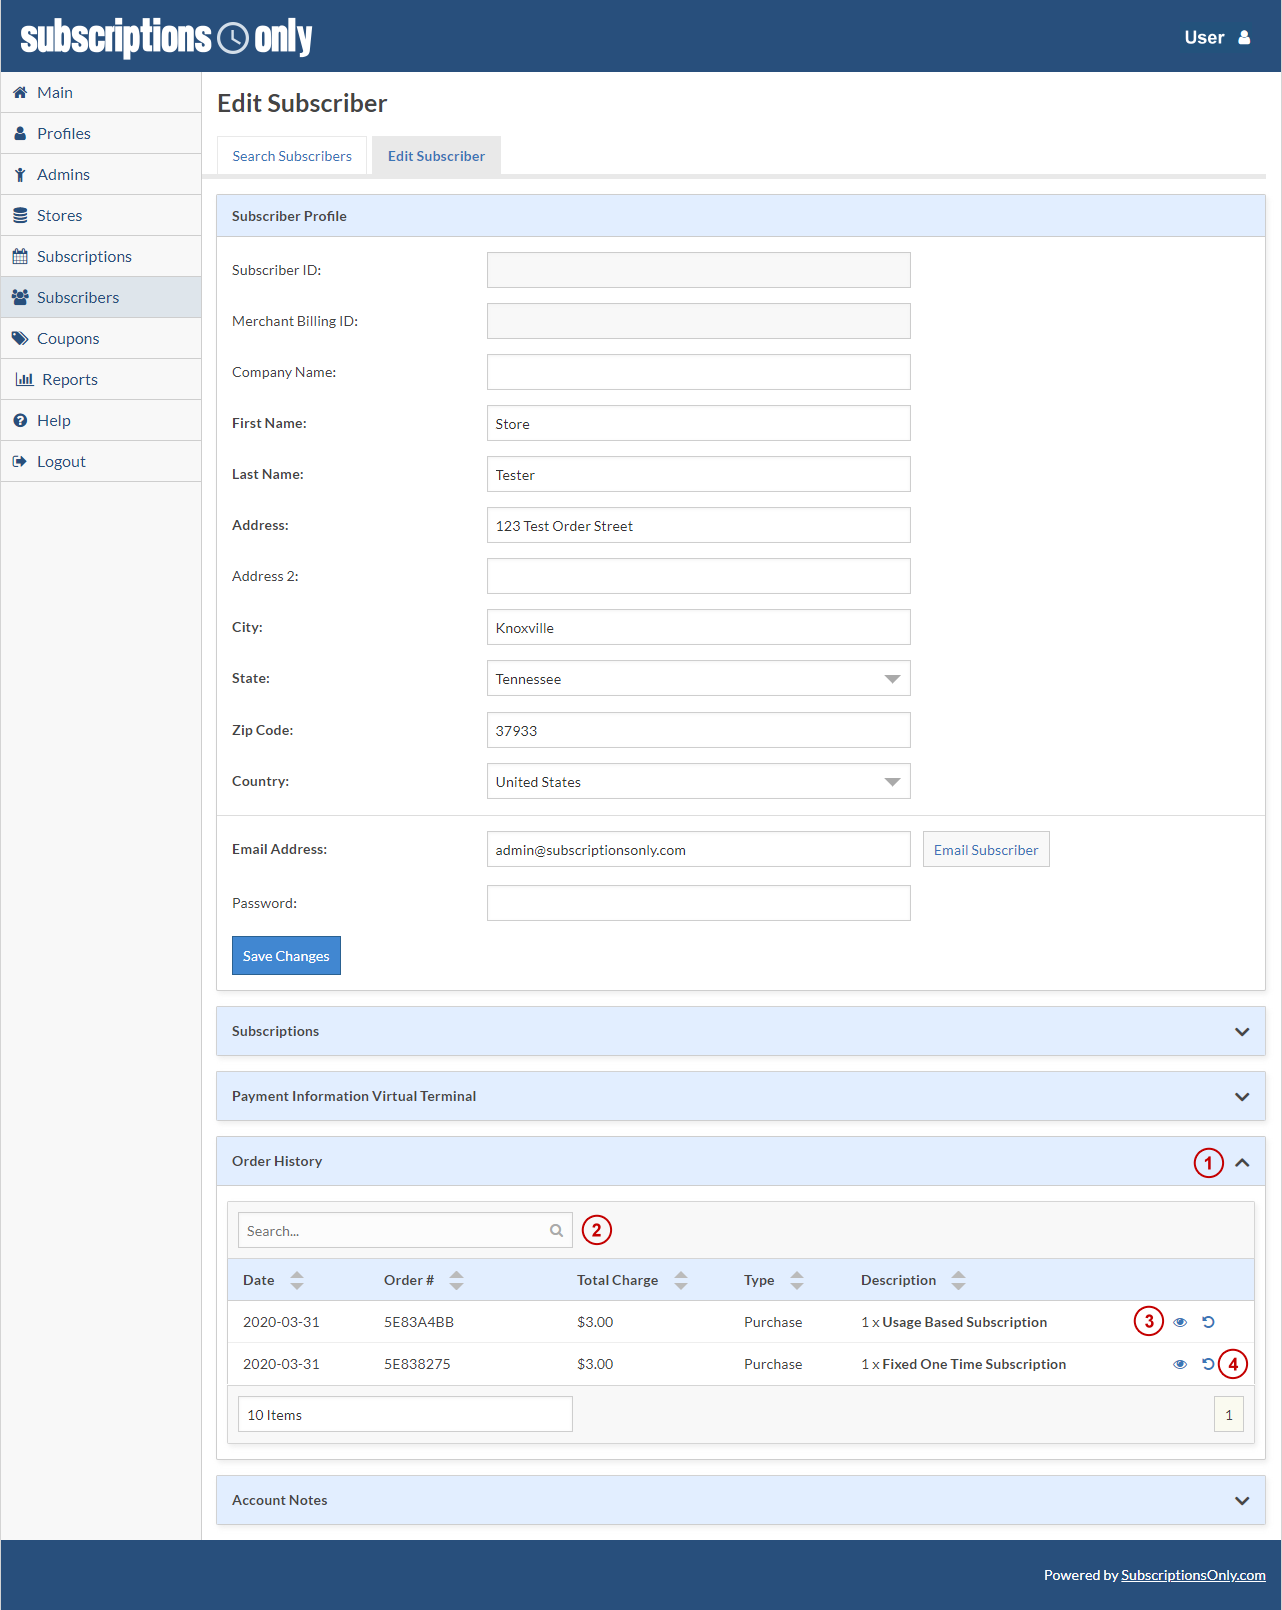
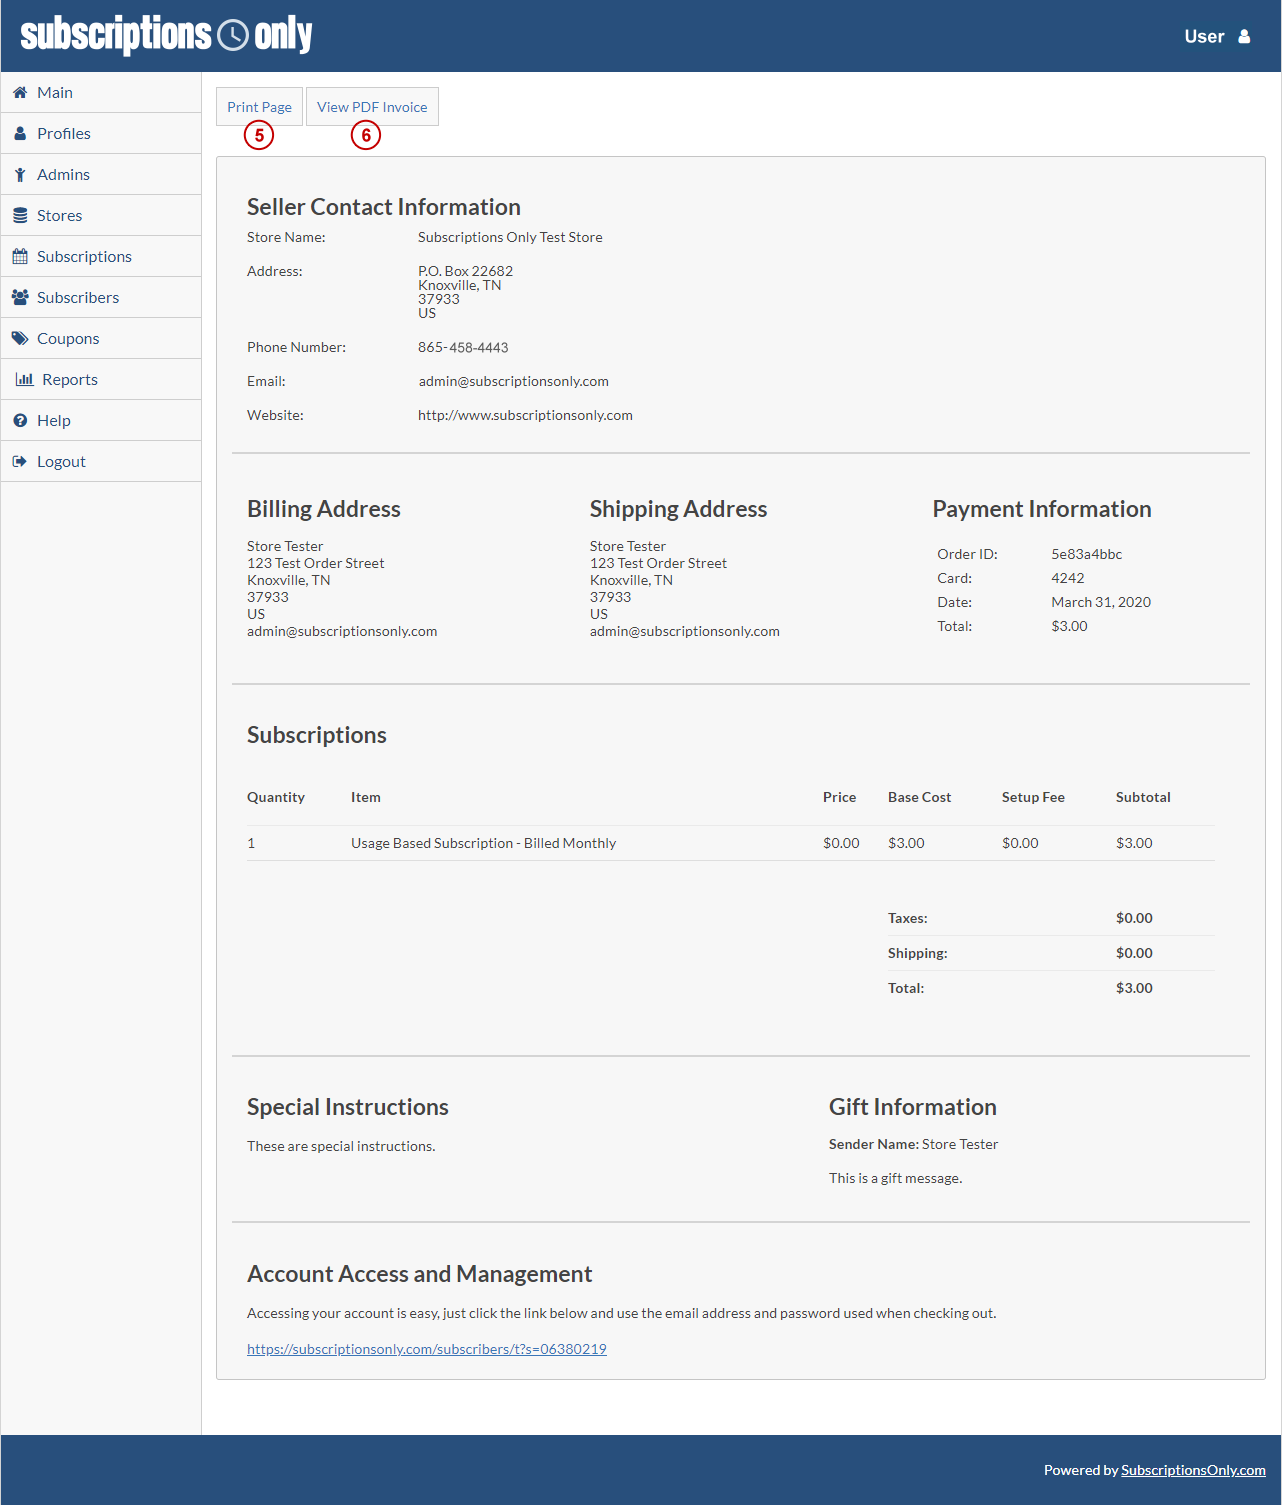
To view a copy of the invoice for a specific transaction, click the view icon and the invoice will load in a new tab. This invoice is a copy of the invoice the subscriber received upon checkout. If you want to print the invoice click Print Page (5). If you want to view the invoice as a PDF click View PDF Invoice (6).
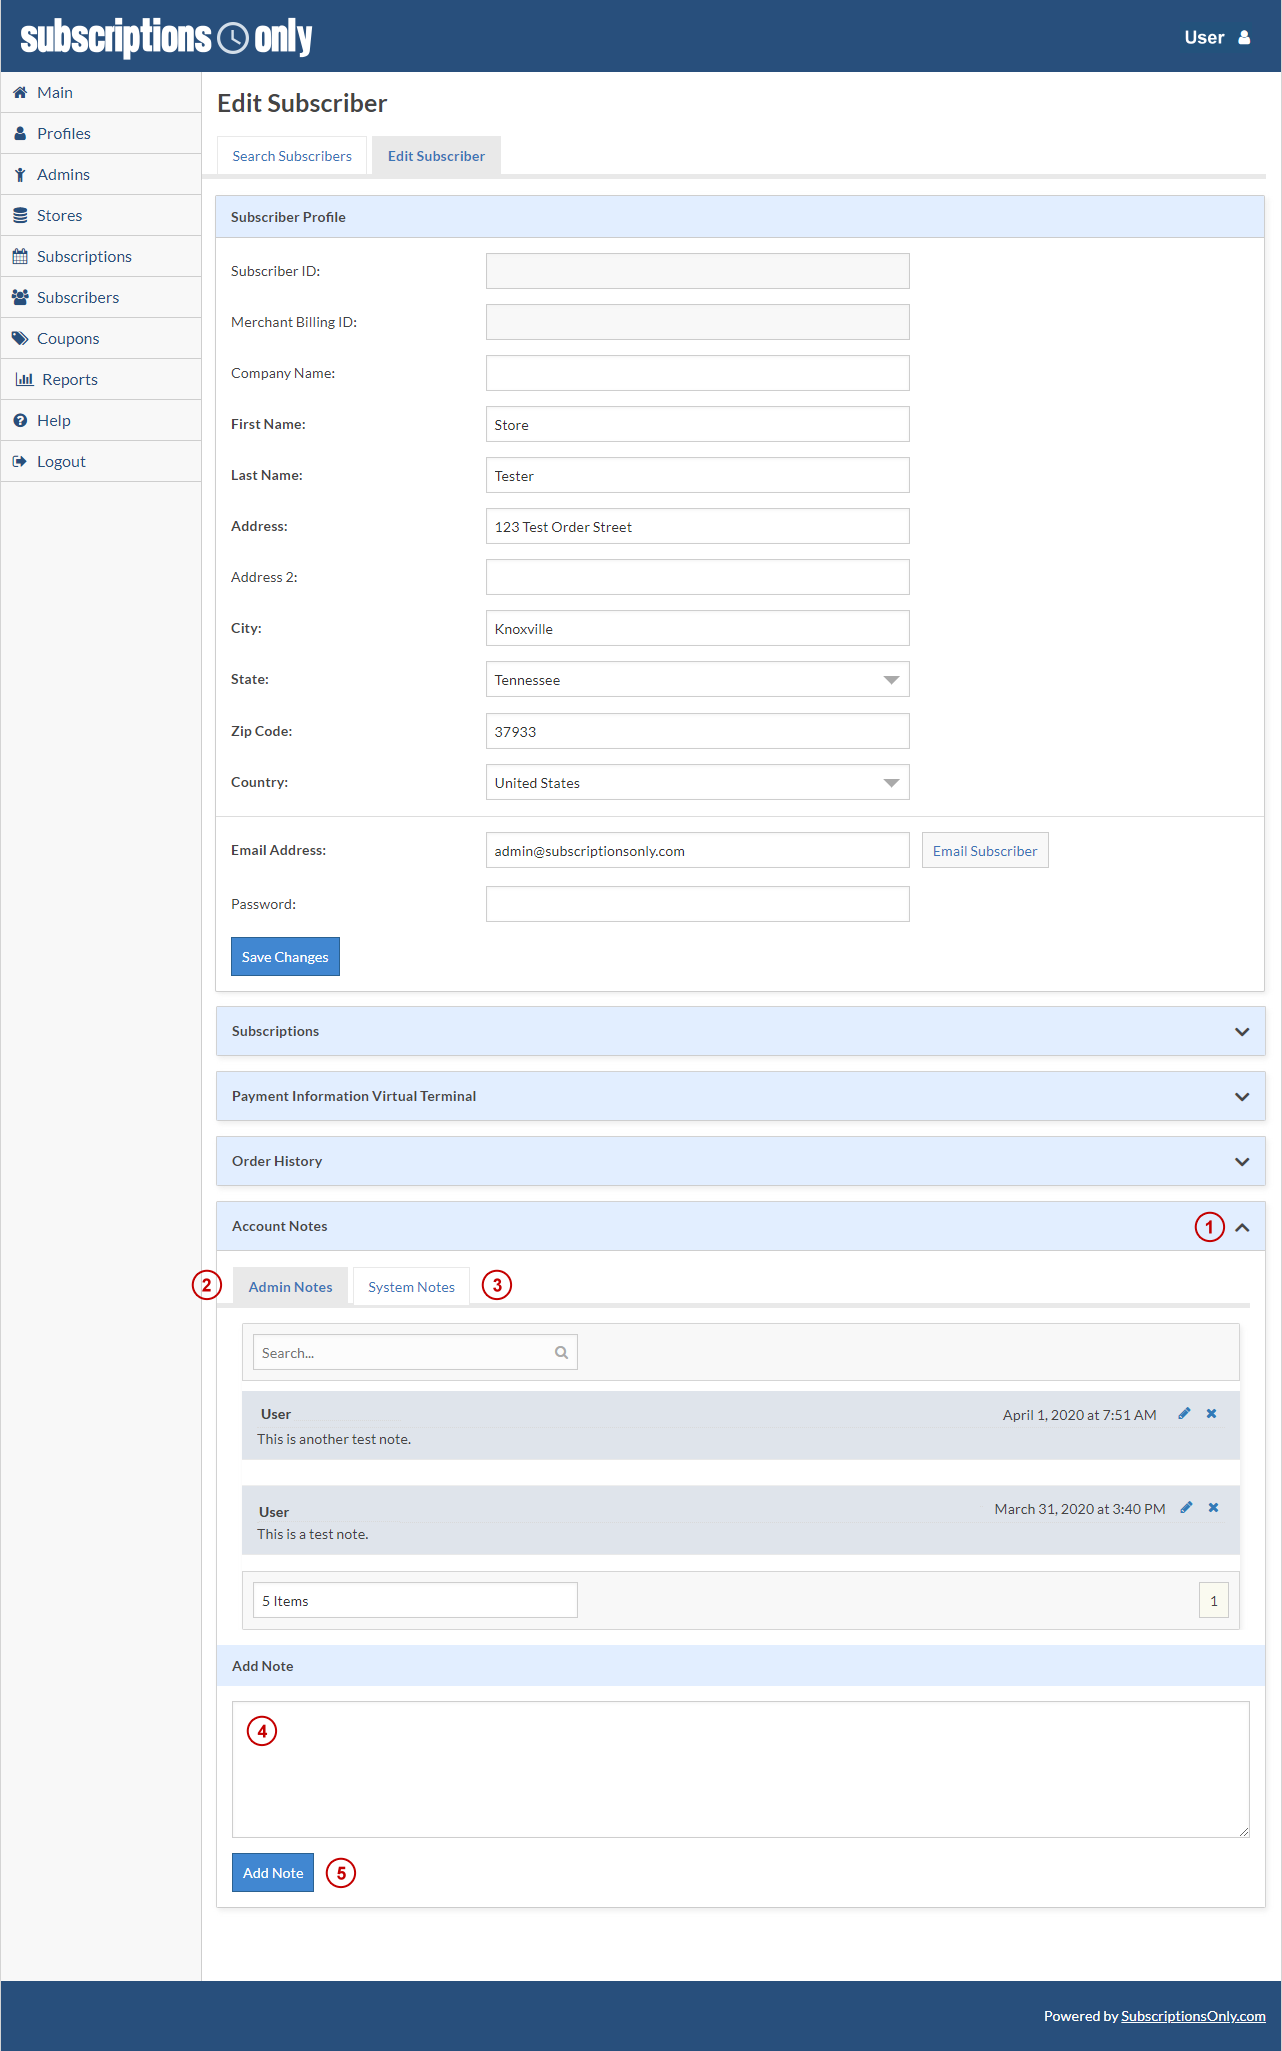
Account Notes
If you’re into notes and note taking we’ve got you covered. Our Account Notes area not only allows you to make notes about your subscriber but we also provide system notes for transactions and other system related events.
You’ll need to get to the Edit Subscriber page first. Once inside the Subscriber's Profile choose Account Notes (1).
In the Account Notes area you will see two tabs, one called Admin Notes (2) and one called System Notes (3). You can click on either tab to see notes in each area. Admin Notes are made by you and the admins you assign access. System Notes are automatically generated notes about transactions and other system related events.
If you add a new Admin Note (4) make sure to click Add Note (5) for the note to be saved.
Admin Notes can be edited and deleted by using the appropriate icons ( & ).